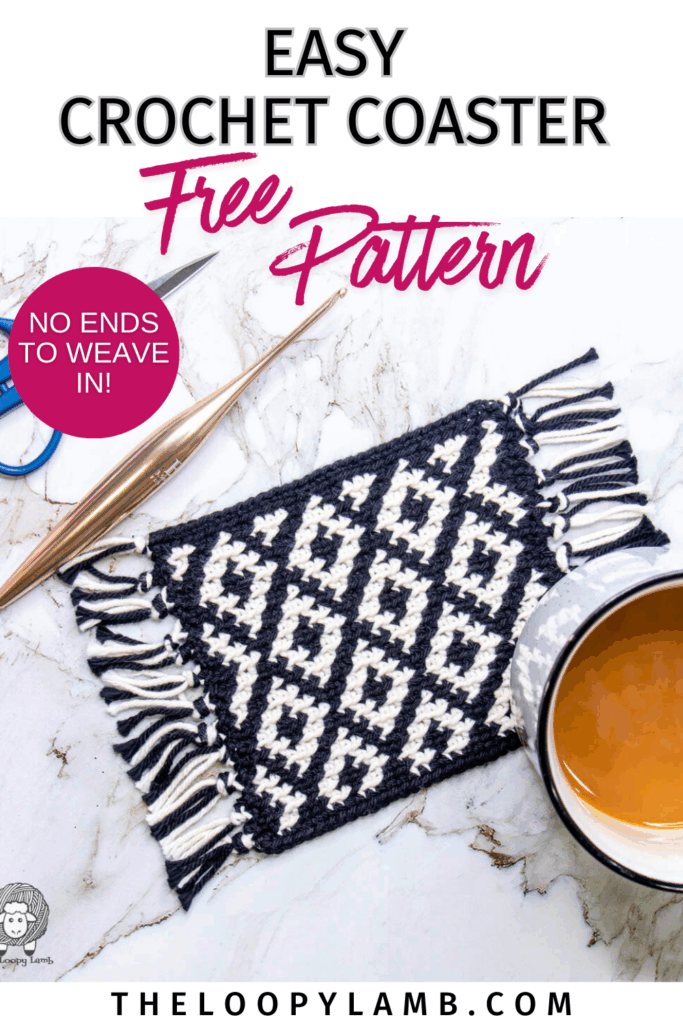
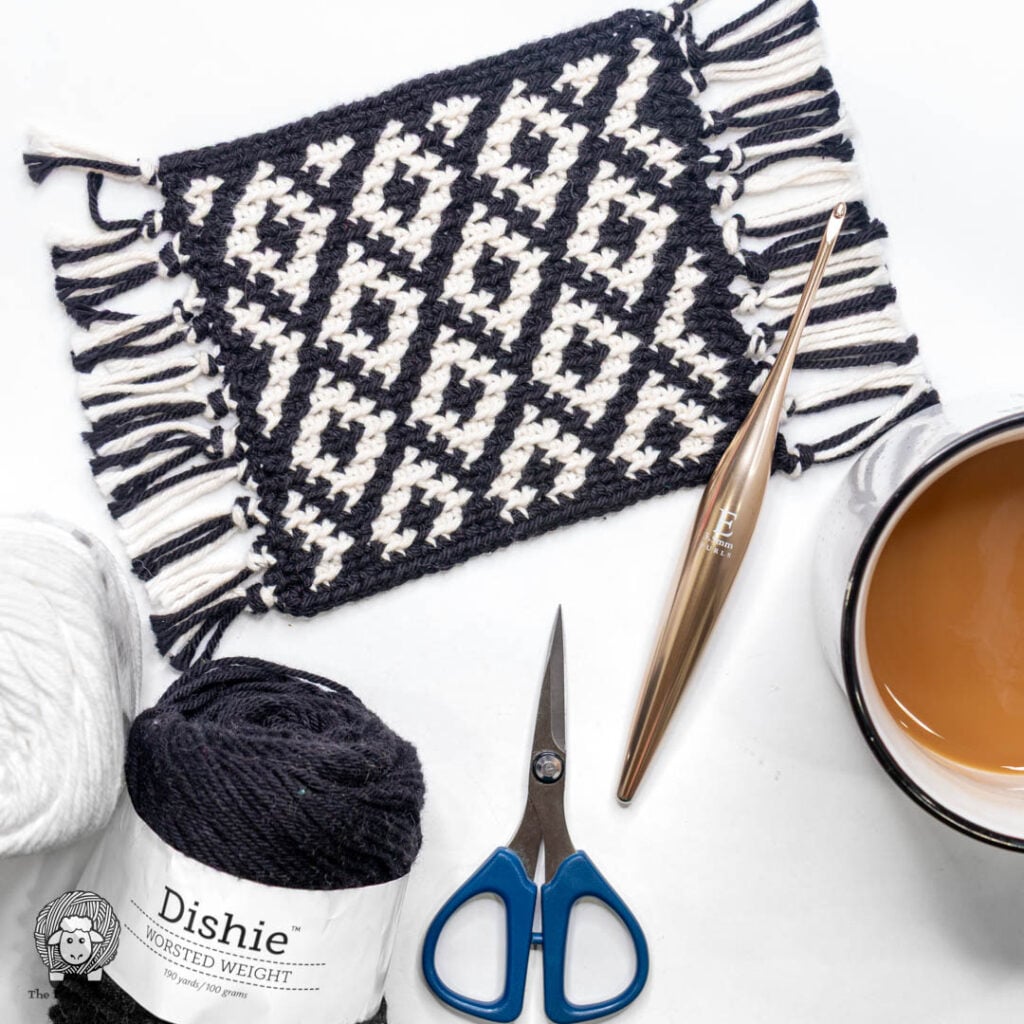
Tapestry crochet is a fun way to add bold, graphic designs to your projects, and today I’m sharing an easy tapestry crochet coaster pattern that’s perfect for beginners. This modern black-and-white design features a simple repeating diamond motif and soft tassels along the sides, giving it a stylish, boho-inspired look that works in any home. It uses basic crochet stitches, uses only two different colors. and there are no ends to weave in at the end, so it’s the perfect way to practice the tapestry crochet technique.
If you’ve been wanting to try tapestry crochet, or you’re ready to make something quick and relaxing, this coaster is a great place to start. In this post you’ll find both the written instructions and the colorwork chart. You don’t need to have existing knowledge of tapestry crochet to make this project. Just be sure to read the Notes section of this pattern to find everything you need to get started.

Pin This Free Pattern to Save It For Later Save It
*This post may contain affiliate links, which means that I may earn a small commission from qualifying purchases made through these links at no extra cost to you. All opinions are my own.*
Dazzling Diamonds Coaster Pattern (PDF)
Want a clean, ad-free version of this pattern you can use anywhere?
This printable PDF includes the full Dazzling Diamonds Coaster pattern with clear, step-by-step instructions and formatting designed for easy printing or tablet use.
Table of contents
What is Tapestry Crochet?
Tapestry crochet is a colourwork technique that lets you create graphic designs using simple stitches. Instead of switching colours and dropping yarn at the back of your work, you’ll carry the unused colour inside your stitches, so everything stays neat, tidy, and the same thickness from row to row.
It’s a beginner-friendly way to add patterns, shapes, and motifs to your crochet without learning any new stitches. If you can single crochet, you can absolutely make beautiful tapestry crochet pieces. Once you get the hang of changing colours and keeping an even tension, the technique becomes really relaxing and the results look impressive with very little extra effort. It’s one of my favorite techniques to use for home décor projects.
How to Read a Tapestry Crochet Chart:
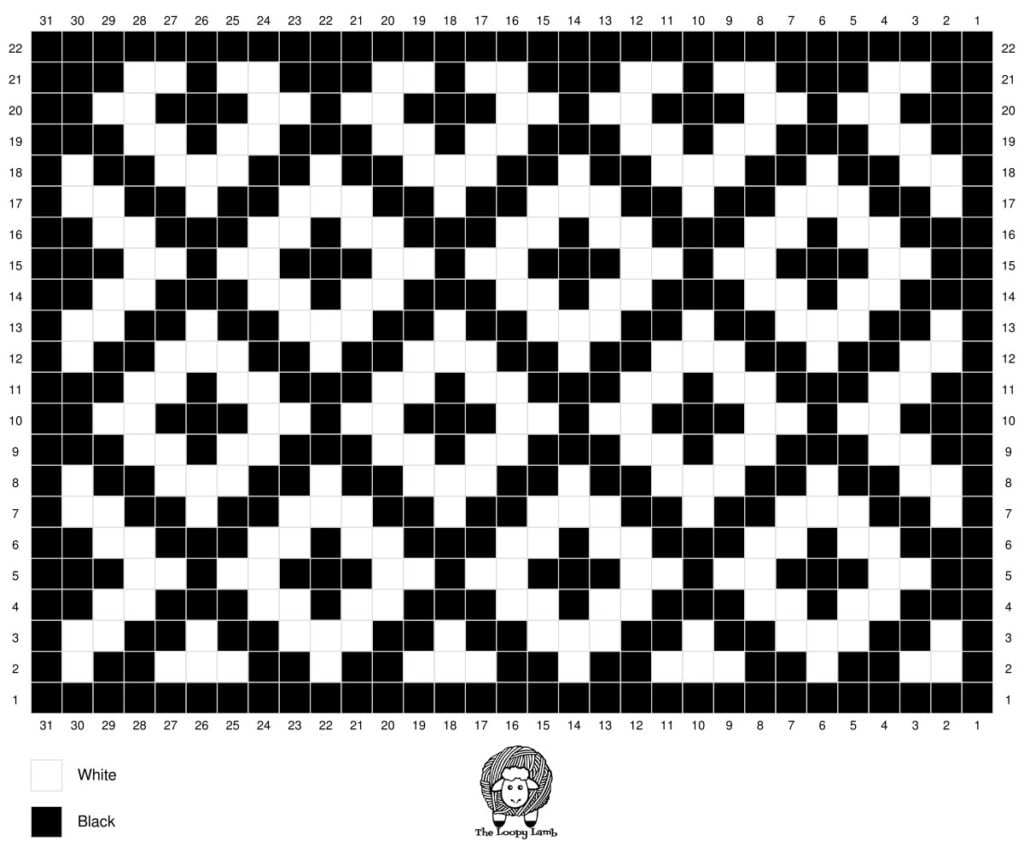
Read the chart starting in the bottom right-hand corner of the chart (for right-handed people) and start in the bottom left-hand corner of the chart for left-handed people. Each box in the color chart = 1 single crochet stitch. Each new row starts in the first box on the right-hand side of the chart for right-handed people and on the left-hand side of the chart for left-handed people and finishes in the last box of that round on the opposite side.
How to Read the Written Color Changes:
The number next to the color in brackets indicates how many stitches in that color to work. For example, “(Black) x 5, (White) x 1” means you’ll work 5 stitches in Black yarn and then 1 stitch in White yarn. For instructions that state “repeat from * two more times”, work the stitches between the first * and the second * two additional times. You’ll complete that section a total of three times.
Helpful Tutorials for This Pattern
If you’re new to tapestry crochet or just want a quick refresher before you begin, these tutorials will walk you through the techniques used in this pattern:
- Standing Single Crochet / SC Join
- Working Into the Back Bump of the Chain
- How to Seamlessly Change Colours
Video Tutorial: How to Change Colours in Tapestry Crochet
Disclaimer
This pattern is © Ashley Parker of The Loopy Lamb. You’re welcome to sell finished product made using it, I kindly request that you credit The Loopy Lamb as the pattern designer and link to https://theloopylamb.com. This pattern is for personal use only. Please don’t copy, share, or repost the pattern itself, translate or alter it, or use my photos. Video tutorial creation using this pattern is strictly prohibited.
Thank you for supporting independent designers by viewing this pattern right here on my blog. It helps me keep sharing free patterns with you.
Skill Level:
- Easy
Terminology:
- U.S. Terminology
Supplies:
- 3.5 mm (E) Crochet Hook (or size needed to obtain gauge)
- WeCrochet Dishie (100% Cotton, Worsted Weight yarn (4), 190yds/174m, 100g/3.5oz), 1 skein each of:
- Black (approx. 35 yds)
- Swan or White (approx. 13 yds)
- Scissors
- Tapestry Needle
Abbreviations:
- BLO = Back Loop Only
- CH = Chain
- FO = Finish Off
- SC = Single Crochet
- SL ST = Slip Stitch
- ST(s) = Stitch(es)
Finished Size:
- 5” tall by 5.75” wide, not including fringe
Gauge:
- 22 sts x 18 rows = 4 inches
NOTES:
- Gauge is not vital to the pattern, but it may affect the size of your project and the amount of yarn required.
- This pattern is worked from the bottom of the coaster to the top.
- A 3.5mm crochet hook is the recommended hook size for this pattern but I suggest using whatever hook size needed to create a tight, closed fabric free of holes, or whatever hook size needed to match the given gauge.
- If you find that you have holes in your fabric or the yarn you’re carrying is showing through, using the recommended hook size, try going down a hook size until you create a tight fabric with no holes in it and no yarn is showing through.
- If you find that you have holes in your fabric or the yarn you’re carrying is showing through, using the recommended hook size, try going down a hook size until you create a tight fabric with no holes in it and no yarn is showing through.
- At the start of each row, leave a few inches of both working colors hanging along the edges. These strands will become your fringe.
- When attaching your yarn at the start of a row, work your SL ST under both loops of the first ST or use a standing SC/SC Join stitch, worked under both loops to replace the SL ST join and the first SC stitch of the row. THis will help anchor the starting edge of your project.
- To help anchor the opposite edge of your project, work the last stitch of each row under both loops. All remaining stitches in the row are worked in the BLO (back loops only). The right side/front side of the project is always facing you. Do not turn your work.
- Carry unused colours and crochet over them as you go, even on rows where only one color is used. This helps maintain the same thickness throughout and ensures there are yarn tails for fringe on each end.
- For Rows 2-22, reattach yarn in the color needed for the first stitch to the first stitch of the previous row. Carry the yarn inside your stitches, even on single-color rows.
- Each row ends by fastening off both colors, leaving a yarn tail of a few inches to create your fringe (you’ll trim it up at the end).
Dazzling Diamonds Tapestry Crochet Coaster Written Pattern
Using Black, CH 32.
Row 1: SC in the back bump of the 2nd CH from the hook and each CH across. FO. (31)
Need help learning how to crochet in the back bump of the chain? Check out my back bump tutorial here.
Row 2: Attach yarn in Black under both loops of the first ST of Row 1, (White) x 2, *(Black) x 2, (White) x 1, (Black) x 2, (White) x 3, repeat from * two more times, (Black) x 2, (White) x 1, (Black) x 1. FO.
Row 3: Attach yarn in Black under both loops of the first ST of Row 2, (White) x 1, *(Black) x 2, (White) x 3, (Black) x 2, (White) x 1, repeat from * two more times, (Black) x 2, (White) x 2, (Black) x 1. FO.
Row 4: Attach yarn in Black under both loops of the first ST of Row 3, (Black) x 2, (White) x 2, *(Black) x 1, (White) x 2, (Black) x 3, (White) x 2, repeat from * two more times, (Black) x 2. FO.
Row 5: Attach yarn in Black under both loops of the first ST of Row 4, (Black) x 1, (White) x 2, *(Black) x 3, (White) x 2, (Black) x 1, (White) x 2, repeat from * two more times, (Black) x 3. FO.
Row 6: Attach yarn in Black under both loops of the first ST of Row 5, (Black) x 2, (White) x 2, *(Black) x 1, (White) x 2, (Black) x 3, (White) x 2, repeat from * two more times, (Black) x 2. FO.
Row 7: Attach yarn in Black under both loops of the first ST of Row 6, (White) x 1, *(Black) x 2, (White) x 3, (Black) x 2, (White) x 1, repeat from * two more times, (Black) x 2, (White) x 2, (Black) x 1. FO.
Row 8: Attach yarn in Black under both loops of the first ST of Row 7, (White) x 2, *(Black) x 2, (White) x 1, (Black) x 2, (White) x 3, repeat from * two more times, (Black) x 2, (White) x 1, (Black) x 1. FO.
Row 9: Attach yarn in Black under both loops of the first ST of Row 8, (Black) x 1, (White) x 2, *(Black) x 3, (White) x 2, (Black) x 1, (White) x 2, repeat from * twice, (Black) x 3. FO.
Row 10: Attach yarn in Black under both loops of the first ST of Row 9, (Black) x 2, (White) x 2, *(Black) x 1, (White) x 2, (Black) x 3, (White) x 2, repeat from * twice, (Black) x 2. FO.
Row 11: Attach yarn in Black under both loops of the first ST of Row 10, (Black) x 1, (White) x 2, *(Black) x 3, (White) x 2, (Black) x 1, (White) x 2, repeat from * two more times, (Black) x 3. FO.
Row 12: Attach yarn in Black under both loops of the first ST of Row 11, (White) x 2, *(Black) x 2, (White) x 1, (Black) x 2, (White) x 3, repeat from * two more times, (Black) x 2, (White) x 1, (Black) x 1. FO.
Row 13: Attach yarn in Black under both loops of the first ST of Row 12, (White) x 1, *(Black) x 2, (White) x 3, (Black) x 2, (White) x 1, repeat from * two more times, (Black) x 2, (White) x 2, (Black) x 1. FO.
Row 14: Attach yarn in Black under both loops of the first ST of Row 13, (Black) x 2, (White) x 2, *(Black) x 1, (White) x 2, (Black) x 3, (White) x 2, repeat from * twice, (Black) x 2. FO.
Row 15: Attach yarn in Black under both loops of the first ST of Row 14, (Black) x 1, (White) x 2, *(Black) x 3, (White) x 2, (Black) x 1, (White) x 2, repeat from * two more times, (Black) x 3. FO.
Row 16: Attach yarn in Black under both loops of the first ST of Row 15, (Black) x 2, (White) x 2, *(Black) x 1, (White) x 2, (Black) x 3, (White) x 2, repeat from * two more times, (Black) x 2. FO.
Row 17: Attach yarn in Black under both loops of the first ST of Row 16, (White) x 1, *(Black) x 2, (White) x 3, (Black) x 2, (White) x 1, repeat from * two more times, (Black) x 2, (White) x 2, (Black) x 1. FO.
Row 18: Attach yarn in Black under both loops of the first ST of Row 17, (White) x 2, *(Black) x 2, (White) x 1, (Black) x 2, (White) x 3, repeat from * two more times, (Black) x 2, (White) x 1, (Black) x 1. FO.
Row 19: Attach yarn in Black under both loops of the first ST of Row 18, (Black) x 1, (White) x 2, *(Black) x 3, (White) x 2, (Black) x 1, (White) x 2, repeat from * two more times, (Black) x 3. FO.
Row 20: Attach yarn in Black under both loops of the first ST of Row 19, (Black) x 2, (White) x 2, *(Black) x 1, (White) x 2, (Black) x 3, (White) x 2, repeat from * twice, (Black) x 2. FO.
Row 21: Attach yarn in Black under both loops of the first ST of Row 20, (Black) x 1, (White) x 2, *(Black) x 3, (White) x 2, (Black) x 1, (White) x 2, repeat from * two more times, (Black) x 3. FO.
Row 22: Attach yarn in Black under both loops of the first ST of Row 21, (Black) x 30. FO.
How to Add Fringe to Your Crochet Coaster
Tie several strands of the fringe together at a time in an overhand knot to create tassels along the sides of your work and secure the ends. Trim the fringe so it’s all the same length.
Tip: If your mug rug seems to lean to one side, I recommend steam blocking the mug rug to straighten it out.
Dazzling Diamonds Color Work Chart
I hope you enjoy making this tapestry crochet coaster as much as I loved designing it. It’s a quick, satisfying project that adds a touch of handmade charm to your home, and it’s a great way to practice colorwork in a stress-free way. If you try it, please share your photos with me. I always love seeing your creations. Happy crocheting!
Other Free Tapestry Crochet Patterns To Check Out Next:
The following projects make great gifts. From glasses cases, pillows and crochet coasters and mug rugs, there’s a lot of projects here to try:
- Dazzling Diamonds Sunglasses Case
- It’s Coffee Time Square Coaster
- Happy Crab Mug Rug
- Monstera Leaf Crochet Mug Rug
- Mad About Boo Pillow
- The Ghoster Coaster
- Silent Night Crochet Christmas Cracker
I hope you enjoy making this tapestry crochet coaster as much as I loved designing it. It’s a quick, satisfying project that adds a touch of handmade charm to your home, and it’s a great way to practice colorwork in a stress-free way. If you try it, please share your photos with me. I always love seeing your creations. Happy crocheting!
Frequently Asked Questions
Use a smaller hook, keep your tension even, and make sure the unused colour lies flat inside your stitches. If little bits still peek through, try gently adjusting the yarn with your hook before moving on.
Yes! This pattern uses simple single crochet stitches and just two colours. The repeats are easy to memorize, and you’ll find both a written pattern and a chart to guide you.
No. You can follow the written instructions alone, but the chart is there if you prefer visual guidance or want to learn how charts work.
A slight lean is normal in tapestry crochet because of how the carried yarn sits inside the stitches. Some curling in the corners is normal as well. A quick steam block will straighten everything out and help your coaster lay perfectly flat.
A sturdy, smooth cotton yarn works best because it creates crisp stitch definition and helps the graphic design stand out. I used WeCrochet Dishie for this project.
Using cotton yarn makes it easy to wash and dry. For best results, reshape it while it’s damp and allow it to air dry flat.
Absolutely. You can add more border stitches on the sides or repeat the diamond motif to create a larger mug rug or even a placemat. Alternatively, you can swap out a different yarn weight and hook size to quickly and easily resize it.
If you’re sharing your finished tapestry crochet coaster on social media, I’d love to cheer you on and share your post with our community! Tag me @theloopylamb or use #theloopylamb so I can see your adorable creations and maybe even feature you in my stories.
Join The Loopy Lamb Crochet Community Facebook Group to connect with other crafty friends and share your fabulous projects made with this free tapestry crochet coaster pattern! Don’t forget to follow me on social media so you always know when new youtube tutorials and other free crochet patterns are released. Happy Crocheting!
Facebook Page: www.facebook.com/TheLoopyLamb
Instagram: www.instagram.com/TheLoopyLamb
YouTube: The Loopy Lamb YouTube Channel
TikTok: www.tiktok.com/@theloopylamb
Pinterest: www.pinterest.com/theloopylamb
Newsletter: Sign up for my newsletter!