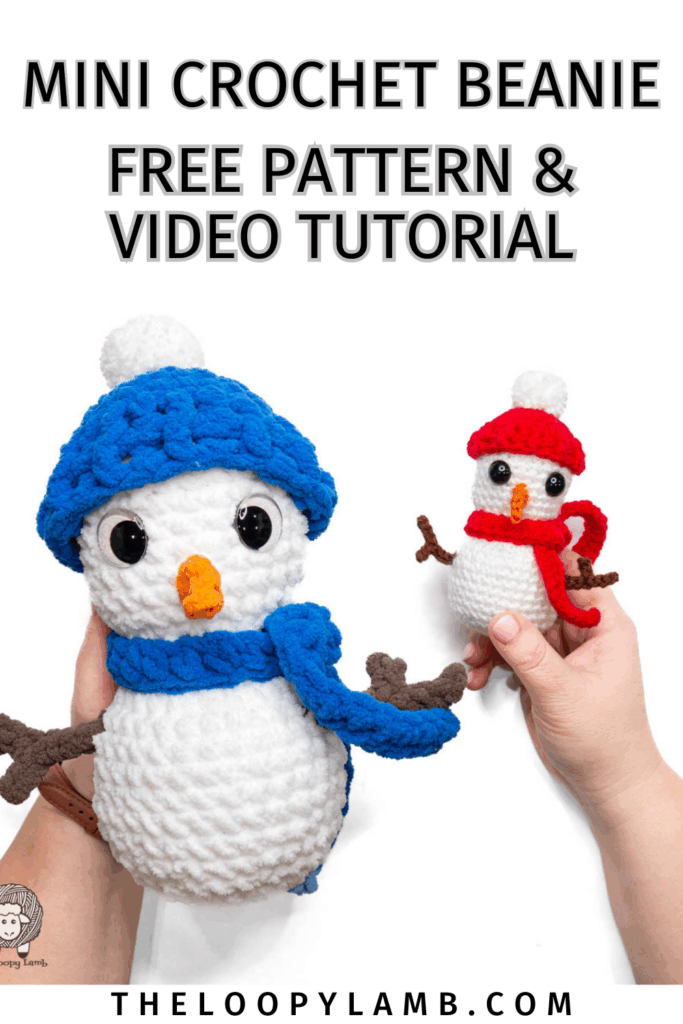
Snowmen are a staple for the winter holidays and today I’m sharing with you my mini beanie for amigurumi snowman pattern to help you accessorize my Chillin’ With My Snowmies No Sew snowman pattern. It’s a quick project uses basic stitches, so it works up quickly.
This cute crochet pattern is great to add some snowmen to your holiday decor. You’ll find a step-by-step video tutorial for this project included below as well.
Pin This Free Pattern To Your Pinterest Crochet Board for later SAVE
*This post may contain affiliate links, which means that I may earn a small commission from qualifying purchases made through my affiliate link at no extra cost to you. All opinions are my own.*

Dress-Up Snowman Collection (Ad-Free PDF)

If you’d like a clean, easy-to-print version of this pattern plus two other snowman hat patterns, you can find the Dress-Up Snowman Collection in my Etsy and Ravelry shops. Snowman pattern sold separately.
Table of contents
About this Mini Beanie Pattern
This crochet snowman hat pattern is designed to fit my Jumbo and Mini No Sew Crochet Snowmen patterns. You’ll find two material lists: one to make the project with worsted weight yarn for the mini snowman and one to use chenille yarn to make it for the jumbo snowman. The instructions to make the beanie are the same for both, with only slight variations for the colors used.
If you haven’t made your amigurumi snowman yet, click the button below for the snowman size you want to make to get started:
Want Other Hats for Your Amigurumi Snowman?
This pattern is part of my Dress-Up Snowman Collection, designed for my Chillin’ With My Snowmies No Sew Snowman pattern. There are 3 different hats in the collection: a beanie, a top hat and a santa hat. You can grab them all in a printable, ad-free PDF in my Ravelry and Etsy shops or wait until they become ad-supported free patterns here on my blog in the coming week.
Will This Mini Crochet Hat Fit Other Amigurumi?
Sure! But you’ll have to make the hat to see if it will fit your toy. I have provided some measurements below but since everyone’s tension/gauge is different and the amount of stuffing you add to your toy can vary, the best way to see if it will fit is to try it on. These hats are designed in a way that you can try them on early to gauge the fit.
Disclaimer
This pattern is © Ashley Parker of The Loopy Lamb. You’re welcome to sell finished product made using it, I kindly request that you credit The Loopy Lamb as the pattern designer and link to https://theloopylamb.com. This pattern is for personal use only. Please don’t copy, share, or repost the pattern itself, translate or alter it, or use my photos. Video tutorial creation using this pattern is strictly prohibited.
Thank you for supporting independent designers by viewing this pattern right here on my blog. It helps me keep sharing free patterns with you.
Skill Level:
- Easy
Terminology:
- US Terms
Supplies for Mini Snowman Hats:
- E / 3.5 mm Crochet Hook
- WeCrochet Brava Worsted Weight Yarn (100% Premium Acrylic, Worsted Weight (4), 100 g/3.5 oz, 218 yds/200m), 1 skein each of the following colors:
- Color A: White yarn (approx. 55 yds / 25g / 0.88oz)
- Color D: Red yarn (approx. 36 yds / 16g / 0.6oz)
- Tapestry Needle / Yarn Needle
- Scissors
- Stitch Marker
- 1” pom-pom maker
Supplies for Jumbo Snowman Hats:
- L / 8.0 mm Crochet Hook
- Bernat Blanket Brights Yarn (100% Polyester, Super Bulky (6), 220yds/201m, 300g/10.5oz), 1 skein of:
- Color D: Royal Blue (approx. 52 yds/ 38g / 1.34oz)
- Color D: Royal Blue (approx. 52 yds/ 38g / 1.34oz)
- Bernat Premium (100% Premium Acrylic, Worsted Weight (4), 198g/6.98oz, 360 yds/329m), 1 skein:
- Color E: White (approx. 26 yds / 14g / 0.5oz)
- Color E: White (approx. 26 yds / 14g / 0.5oz)
- Tapestry Needle / Yarn Needle
- Scissors
- Stitch Marker
- 1 3/8″ pom pom maker
Abbreviations:
- BLO = Back Loop Only
- BPDC = Back Post Double Crochet
- CH(s) = Chain(s)
- DC = Double Crochet
- FLO = Front Loop Only
- FO = Finish Off
- FPDC = Front Post Double Crochet
- MC = Magic Circle / Magic Ring
- RS = Right Side
- SC = Single Crochet
- SCINC = Single Crochet Increase / 2 SC STs in the same ST
- SL ST = Slip Stitch
- ST(s) = Stitch(es)
- YO = Yarn Over
Special Stitches and Techniques:
- Yarn Under Single Crochet: Insert hook into indicated stitch, yarn under hook and pull up a loop (2 loops on your hook), yarn over hook and pull through both loops on your hook. Find a tutorial here: https://theloopylamb.com/how-to-yarn-under-single-crochet-for-amigurumi-tutorial/
Finished Size:
- Mini Snowman Hat: Approx 1.25” tall (excluding pom-pom)
- Jumbo Snowman Hat: Beanie: Approx 3” tall (excluding pom-pom)
Gauge:
- Mini Snowman: Rounds 1 – 4 of Beanie = 1.5” across at the widest point.
- Jumbo Snowman: Rounds 1 – 4 of Beanie = 3.5” across at the widest point.
Notes:
- The hats for both snowmen are made using the same pattern; the only changes are the materials used.
- Gauge is not vital to the toy, but not matching gauge will affect the size of your finished toy and the amount of yarn used. Use a consistent tension throughout the toy to create a tight fabric so that stuffing does not show through your stitches.
- The hook sizes given in this pattern are the recommended hook sizes however, I suggest using whatever hook size needed to create a tight, closed fabric free of holes, or whatever hook size needed to match the given gauge.
- If you find that you have holes in your fabric using the recommended hook size, try going down a hook size until you create a tight fabric with no holes in it and no stuffing is showing through.
- If you find that you have holes in your fabric using the recommended hook size, try going down a hook size until you create a tight fabric with no holes in it and no stuffing is showing through.
- Reading the Pattern: Instructions in brackets: I.e.: (SC, SCINC) x 6, this means you’ll work 1 SC stitch in the first stitch and then SCINC in the next and you’ll repeat that pattern a total of 6 times.
- Numbers indicated in () at the end of a Round/Row indicate the number of stitches you should have at the end of the Round/Row. I recommend counting your stitches at the end of each Round/Row before moving on to the next.
- Where SC followed by a number (i.e. SC 14), you’ll work 1 SC stitch in the next 14 stitches or chains, unless the pattern specifies to work those stitches into the same stitch or chain.
- Numbers indicated in () at the end of a Round/Row indicate the number of stitches you should have at the end of the Round/Row. I recommend counting your stitches at the end of each Round/Row before moving on to the next.
- Magic Circle Substitution for pieces starting with a MC: If you struggle with the MC or your yarn breaks when you try to do a MC with it, use a CH 2 and work all Round 1 stitches into the 2nd chain from the hook.
- The Beanie is worked from the top-down (head to bottom) in continuous rounds (unless stated otherwise). Do not join at the end of the Round, unless indicated. A stitch marker is used to keep track of the beginning of the round.
- If you crocheted your snowman using regular single crochet, I recommend using regular single crochet for the hats as well. If you used yarn under single crochet, then use yarn under for the hats as well.
Mini Beanie for Amigurumi Video Tutorial


Mini Beanie for Amigurumi Snowman Free Pattern
Round 1: Using Color D, make a MC and SC 6 into the MC. (6)
Round 2: (SCINC) x 6. (12)
Round 3: (SC, SCINC) x 6. (18)
Round 4: SC, SCINC, (SC 2, SCINC) x 5, SC. (24)
Gauge Check: Piece should measure 3.5” across the widest point for jumbo snowman and 1.5” for the mini snowman.
Round 5: SC around. Join last ST to the first ST with a SL ST (from here on out referred to as “join”). (24)
Round 6: CH 2 (counts as the first DC here and throughout), DC in each ST around. Join. (24)
Round 7: CH 2, (FPDC, BPDC) x 11, FPDC. Join. (24)
FO. Weave in ends. Make a pom pom using worsted-weight yarn in Color A for the Mini Snowman and Color E for the Jumbo Snowman and sew it to the top of the hat using your yarn tail. Learn how to make and attach a yarn pom pom here.
That’s it! I hope you enjoyed making your mini beanie for amigurumi snowman!
Ready to make another tiny hat for your snowman? Check these out!
If you’re sharing your amigurumi snowmen sporting their mini beanies on social media, I’d love to see them, cheer you on and share your post with our community! Tag me @theloopylamb or use #theloopylamb so I can see your adorable creations and maybe even feature you in my stories.
Join The Loopy Lamb Crochet Community Facebook Group to connect with other crafty friends and share your fabulous projects made with this free crochet pattern! Don’t forget to follow me on social media so you always know when new youtube tutorials and other cute patterns are released. Happy Crocheting!
Facebook Page: www.facebook.com/TheLoopyLamb
Instagram: www.instagram.com/TheLoopyLamb
YouTube: The Loopy Lamb YouTube Channel
TikTok: www.tiktok.com/@theloopylamb
Pinterest: www.pinterest.com/theloopylamb
Newsletter: Sign up for my newsletter!