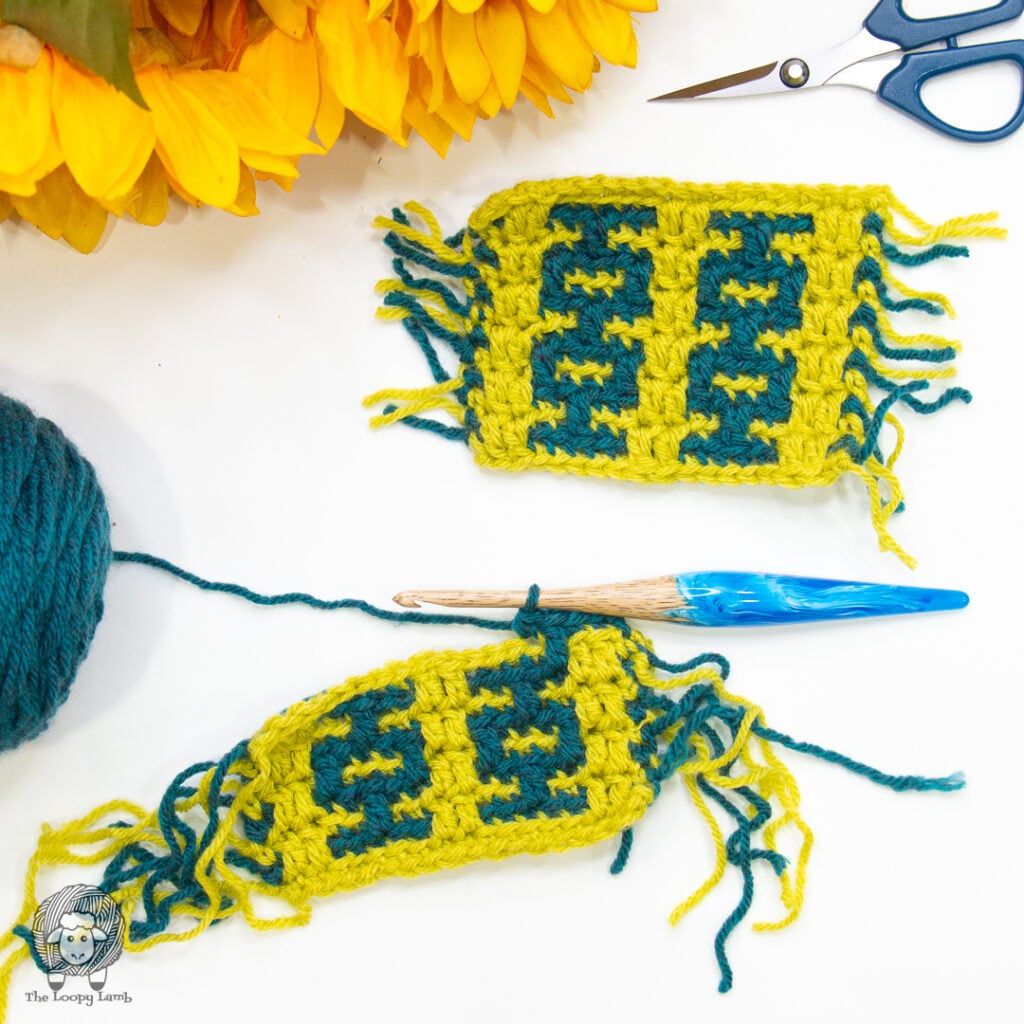
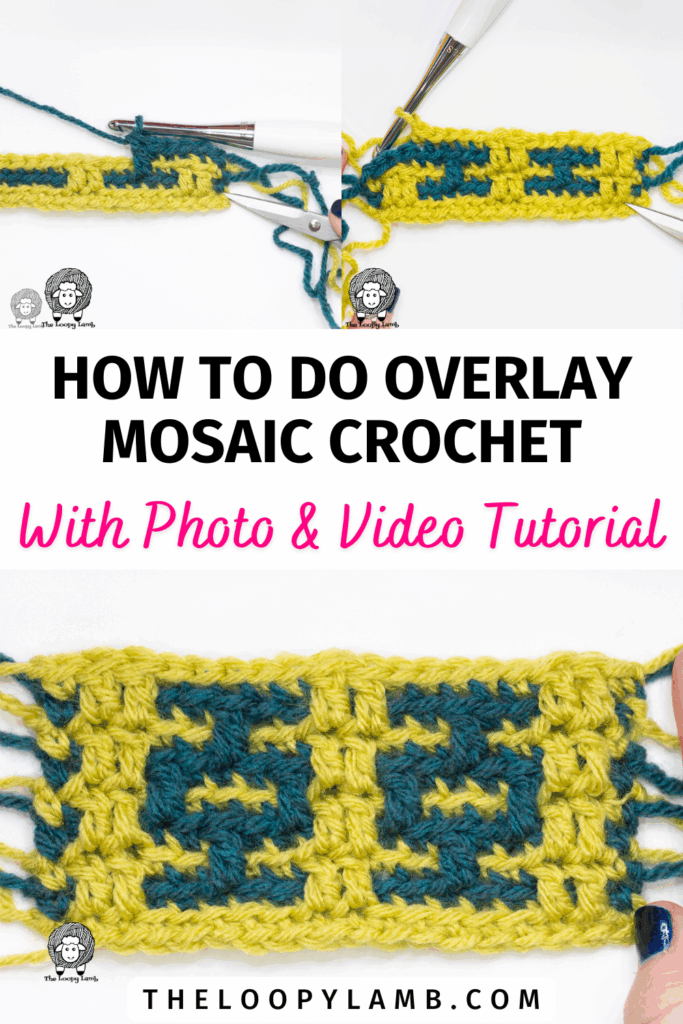
This step-by-step tutorial will show you how to do overlay mosaic crochet. I’ll cover all the basics of mosaic crochet like how to read an overlay mosaic chart, ways to attach your yarn, how to troubleshoot common issues and more. Whether you’re new to mosaic crochet or ready to explore a nice pattern for your next crochet blanket, you’ll leave feeling confident and inspired.
You’ll find both a step-by-step photo tutorial as well as a video tutorial to help ensure you have everything you need to get started.
Pin This To Your Pinterest Crochet Board for later SAVE
*This post may contain affiliate links, which means that I may earn a small commission from qualifying purchases made through these links at no extra cost to you. All opinions are my own.*
Table of contents
- What is Overlay Mosaic Crochet?
- Mosaic Crochet Patterns and Chart Symbols
- Why Try Overlay Mosaic Crochet?
- Materials You’ll Need for Overlay Mosaic Crochet
- Overlay Mosaic Crochet: UK vs. US Terms
- Abbreviations & Special Stitches
- Things to Keep in Mind When Using the Overlay Mosaic Crochet Technique:
- Video Tutorial on Overlay Mosaic Crochet
- Overlay Mosaic Crochet Basics (Step-by-Step)
- Row 5
- Row 6
- Rows 7 and Onwards
- Overlay Mosaic Crochet Tips for Success
- Common Mistakes and How to Fix Them
- FAQs
What is Overlay Mosaic Crochet?
Overlay mosaic crochet is a type of mosaic crochet where you work 1 color per row and use only single crochet and double crochets to create an image. When each row is completed you typically cut your yarn at the end of each row, leaving loose ends that can be handled using different options.
Unlike the inset mosaic crochet technique, where stitches are worked into the chain spaces left open in lower rows, the overlay method creates more compact, detailed designs without gaps between the layers.
Differences Between Overlay & Inset Mosaic
| Overlay Crochet | Inset Mosaic Crochet | |
| How Color Is Worked | One row at a time and fastened off at the end of the row (when worked in rows). | Over two rows. |
| Turning Your Work | You never turn your work. | You turn your work every row. |
| Where Stitches Are Worked | Drop-down stitches are worked in the front loops of stitches one row below, sitting on top of the previous row’s stitches. | Drop-down stitches are worked under both loops of skipped stitches 2 rows below. These stitches are worked into or over a chain space created for those stitches so they are “inset” with the previous row. |
Mosaic Crochet Patterns and Chart Symbols
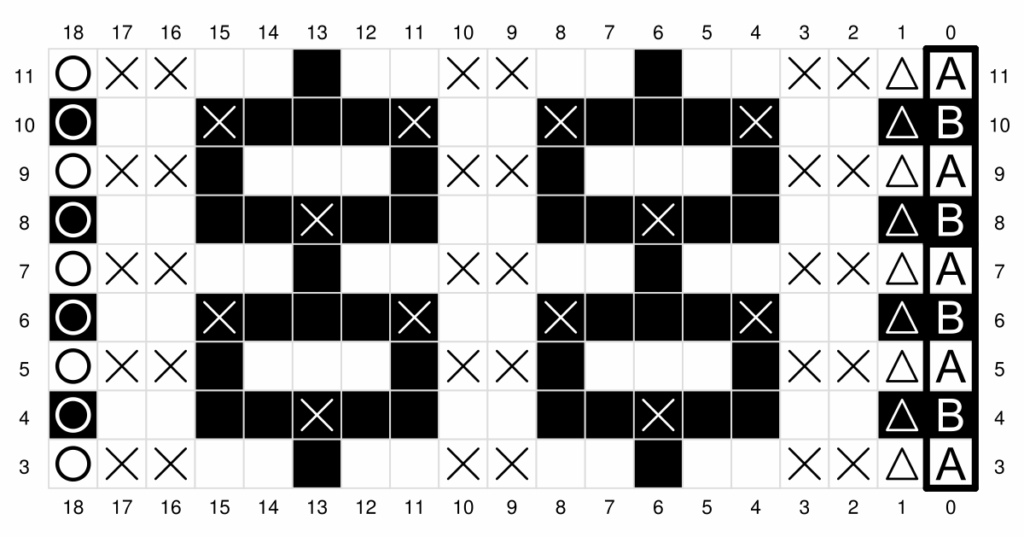
Like other crochet colorwork techniques, mosaic crochet patterns use a colorwork chart to show you how to crochet your pattern Charts are read horizontally from right to left, starting in the bottom right-hand corner. Left-handed crocheters should read the charts from left to right, starting in the bottom left-hand corner.
Mosaic crochet charts use numbered rows, color-coding and symbols to indicate which stitches to work. The front side or right side (RS) is always facing you when working an overlay mosaic crochet pattern. When reading the chart:
- Solid squares: Work a BLO SC stitch into that stitch. If the square is a a different color than what you are using for that row, work a BLO SC
- Marked squares: Often marked with an “X” or another symbol. In these stitches work a drop-down double crochet (sometimes also called a dropped double crochet or mosaic double) into the front loop of the stitch directly below the next stitch. Always skip the stitch behind the drop-down double crochet.
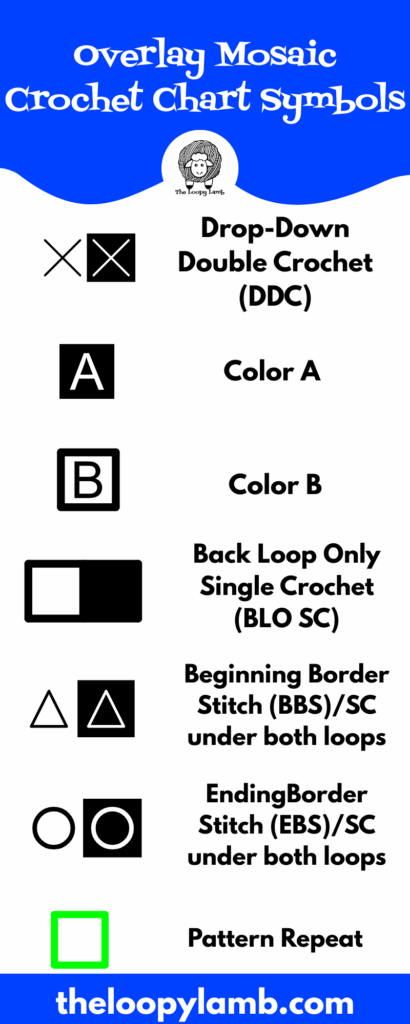
Below is an image of the symbols you’ll find used in overlay mosaic charts. It can vary from designer to designer but a key or legend should be provided with the pattern to explain what the symbols mean.
Why Try Overlay Mosaic Crochet?
Overlay mosaic crochet is perfect for creating a wide variety of beautiful, bold projects:
- Blanket patterns
- Crochet Baskets with Geometric designs with contrasting colors
- Crochet Hats, Mittens and other accessories
- And so much more!
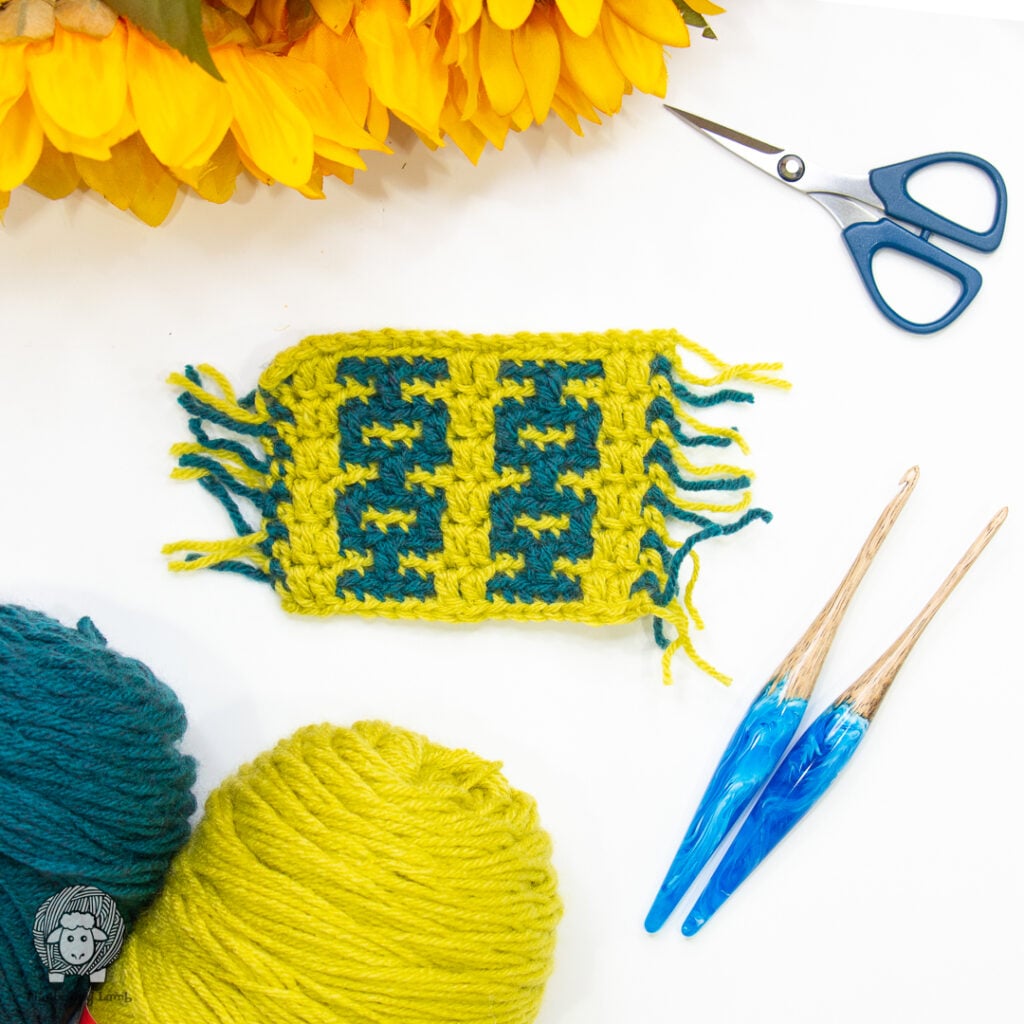
Materials You’ll Need for Overlay Mosaic Crochet
- Yarn: I’m using a worsted weight yarn (4) for this tutorial. Since this is a colorwork technique, the colors you choose are important. It’s ideal to choose contrasting colors to highlight the mosaic design.
- Crochet Hook: Select an appropriate hook size for your yarn weight. I’m using a 6.0mm (J) crochet hook here. These are my favorite ergonomic crochet hooks.
- Stitch Markers: Are handy for marking beginning, ending and corner stitches. – I love these locking stitch markers for this.
- Written Pattern or Mosaic Chart: I’ll share a free pattern below to practice with!
Overlay Mosaic Crochet: UK vs. US Terms
Overlay mosaic patterns can be written using US or UK terminology.
- UK Terms: double crochet / dc = sc
- US Terms: single crochet / sc = sc
Double-check your written instructions to ensure you’re following the correct terminology. This crochet tutorial and pattern both use US terminology.
Abbreviations & Special Stitches
Here are the abbreviations that you’ll see in my overlay mosaic crochet patterns. Some designers may use some name and symbol variations of these but the same stitches are used:
- BBS = Beginning Border Stitch (Standing Single Crochet worked under both loops or slip stitch and single crochet under both loops in the same stitch) (marked in my charts as a triangle of either color)
- BLO SC = Back Loop Only Single Crochet (marked in the charts as a blank square of either color)
- DDC = Drop-Down Double Crochet (DC in the unworked front loop of the stitch in the same color 2 rows below) (marked in the chart as an X of either color)
- EBS = Ending Border Stitch (SC under both loops) (marked in my charts as a circle of either color)
- FO = Fasten Off
Things to Keep in Mind When Using the Overlay Mosaic Crochet Technique:
- The right side of the fabric is always facing you. The wrong side is always facing away from you. You do NOT turn your work at the end of every row. Learn more about how to tell the right side from the wrong side of your crochet fabrics here.
- SC stitches are worked into the back loops only and DC stitches are worked into the front loops only of indicated stitches 2 rows below.
- Overlay mosaic projects typically start with a two-row set-up and they aren’t usually included in the colorwork chart.
- Due to the nature of overlay mosaic crochet, the patterning / design will show only on the right side of the fabric and the back of your work will look like horizontal lines of the two different colors used in the design. Though there are techniques to replicate the image on the back, we will be covering just the basics today.
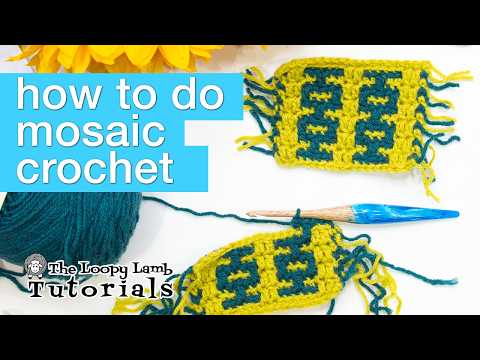
Video Tutorial on Overlay Mosaic Crochet
Prefer to learn visually? Watch my full video tutorial on my YouTube channel. I break down each step, from the foundation row to the finished row, so you can follow along easily.
Overlay Mosaic Crochet Basics (Step-by-Step)
Here is the chart that we’ll be using in today’s tutorial:
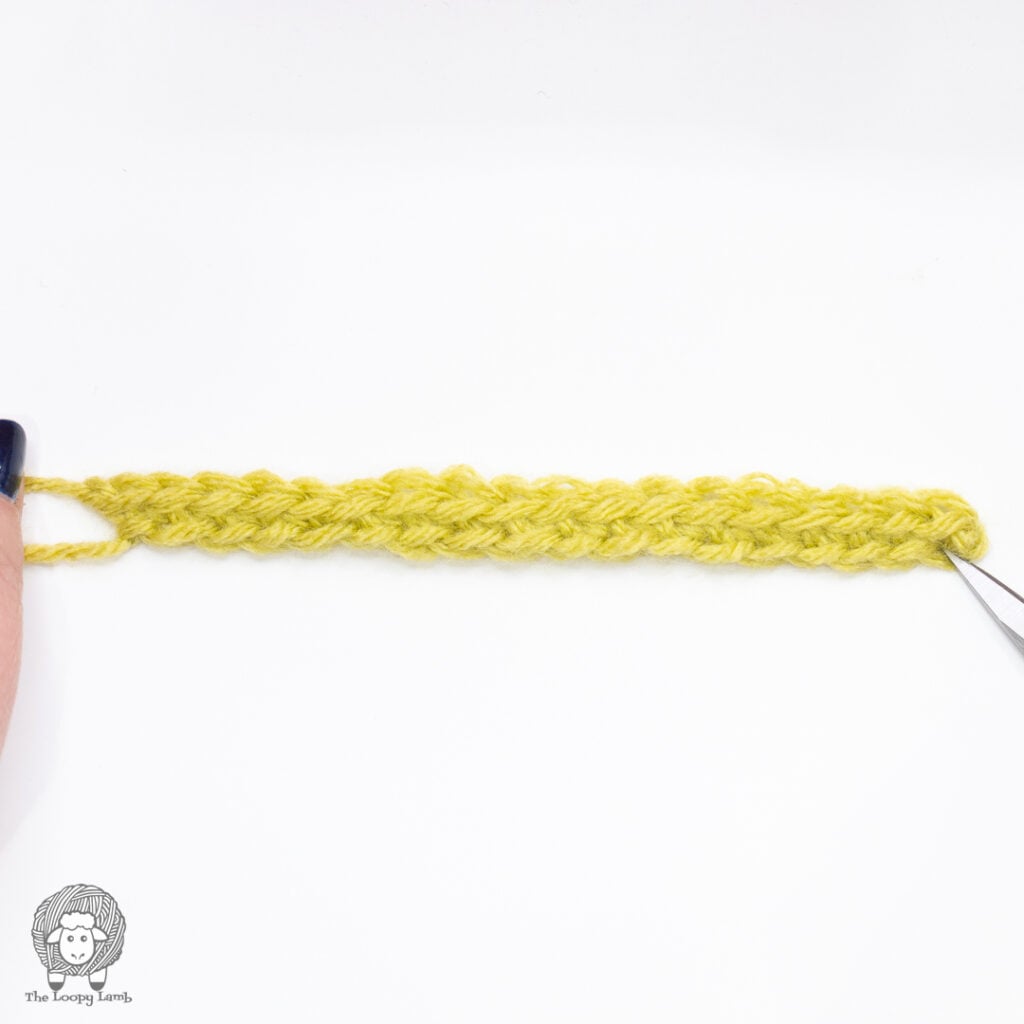
Step 1: Foundation Rows
Start by chaining the appropriate number of chains for your project. In overlay mosaic crochet, it’s beneficial to add border stitches which anchor the beginning and end of each row. For our chart, I will create a chain of 19. 16 for the chart pattern, 2 for the border edges (one on each end) and 1 for my turning chain.
Work a sc row across in color A, starting in the 2nd chain from the hook. This sets up the first foundation row for your overlay mosaic crochet project. Cut your yarn, leaving a tail of 6 – 8″.
Join color B to the first st with a slip stitch or a standing single crochet. Work your first stitch under both loops (this is a border stitch).
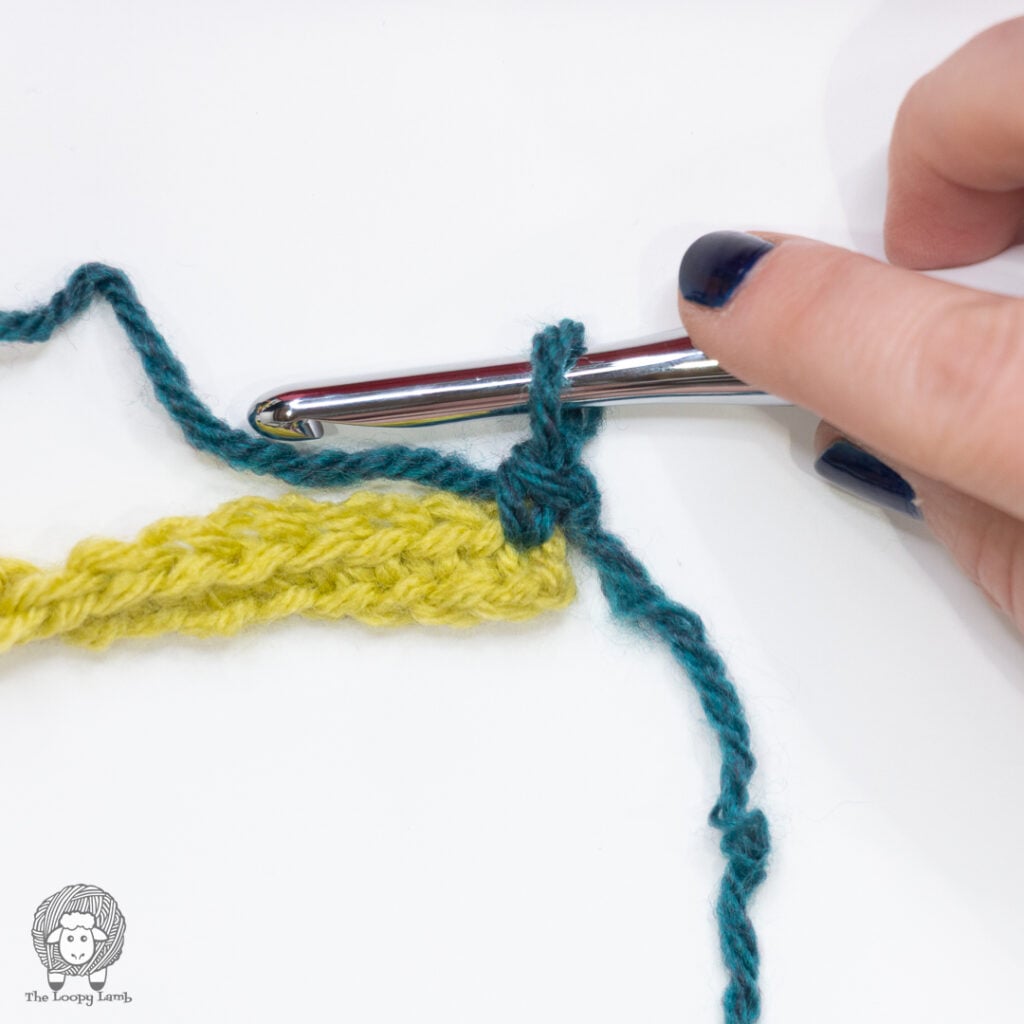
Work a BLO SC stitch into each of the stitches across until 1 stitch remains. Work a single crochet stitch under both loops in the last stitch. This is your last border stitch.
When you reach the last stitch of your row, fasten off, leaving a yarn tail of 6 – 8″. Your foundation rows are now complete and you can start to read your mosaic chart.
Step 2: Following the Mosaic Chart
Most overlay mosaic charts start on row 3 despite some charts using the number “1” to start the chart. They aren’t including the foundation rows.
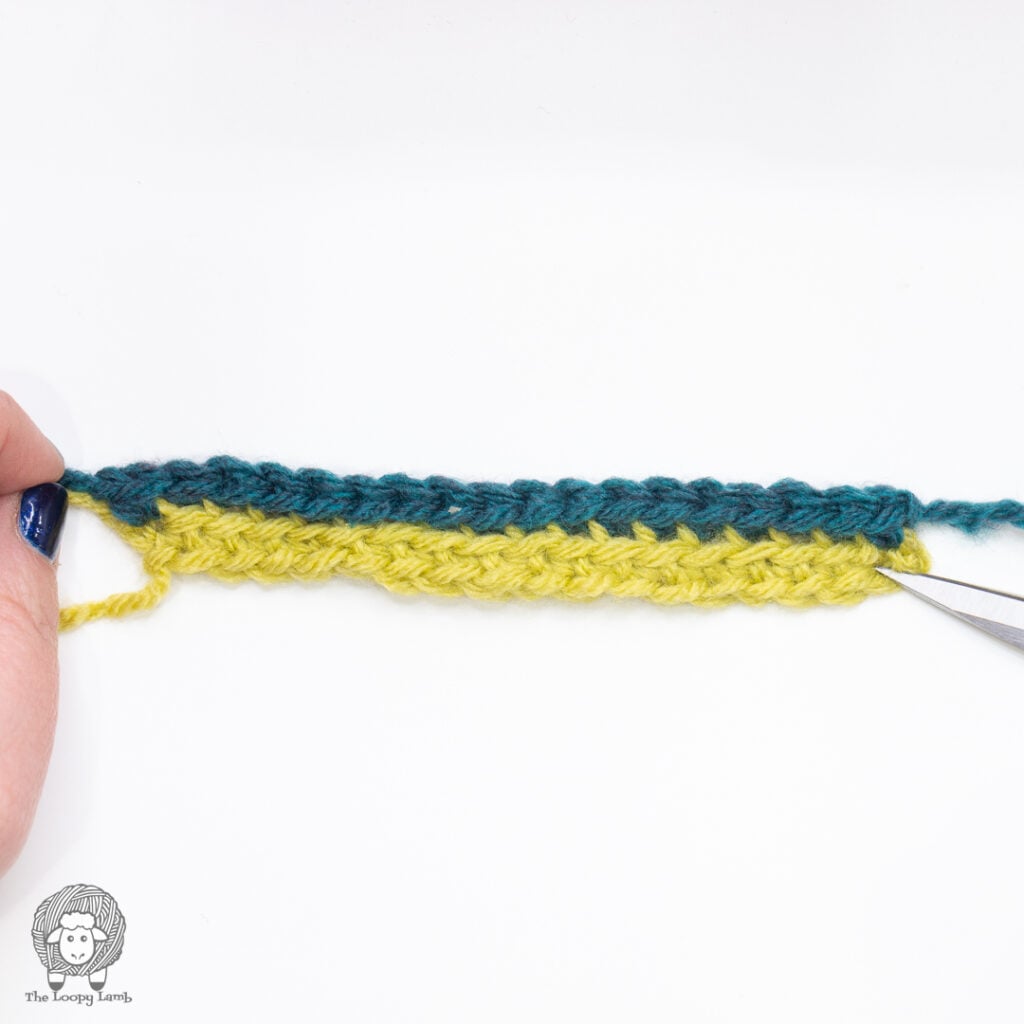
For Row 3 of our chart, you’ll work (from right to left): Beginning Border stitch (aka standing SC or join with a slip stitch and SC under both loops), Drop-Down Double Crochet (DDC) 2, BLO SC 5 and you’ll repeat DDC 2, BLO 5 until 3 stitches remain. Then you’ll work DDC 2, Ending Border Stitch (aka SC under both loops). (See images 1 through 4 below).
Remember that left-handed folks need to read the chart from left to right and swap a BBS for your EBS and vice versa.

Step 4: End of Each Row
When working in rows: At the end of every row, cut your yarn and weave in loose ends. Don’t worry! There are different ways to manage all those yarn ends. For blankets an envelope border is a great way to finish the blanket while neatly concealing ends (we’ll cover this later in another post).
Step 5: Starting the Next Rows
Overlay mosaic crochet involves switching colors every row so each row is worked in a single color, building the design from the previous row. Attach your new color in the first stitch with a BBS or slip stitch and SC under both loops. Then follow the instructions in your chart for that row. Here is how you’ll work Row 4:
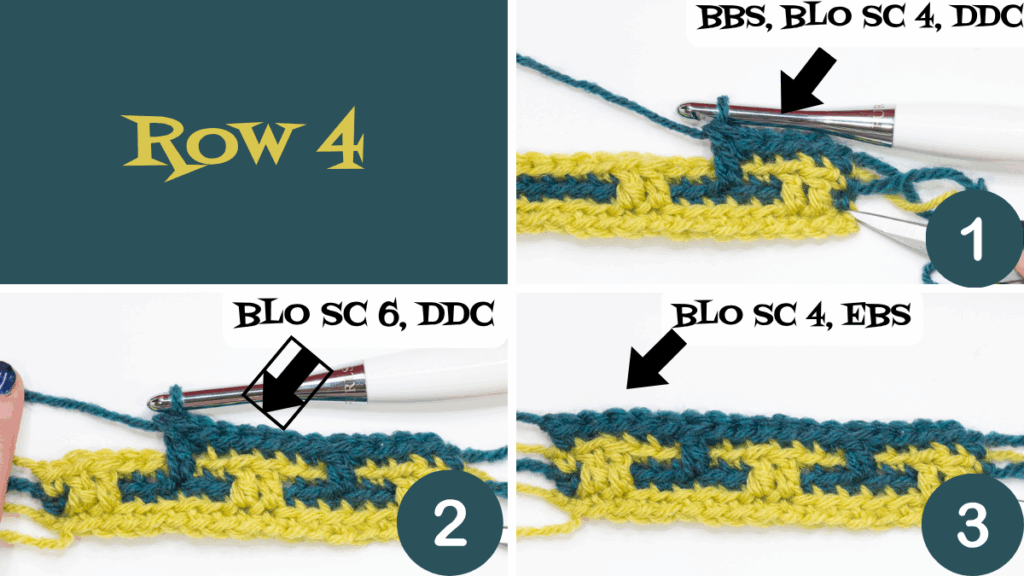
Row 4: With Color B, BBS, BLO SC 4, DDC, BLO SC 6, DDC, BLO SC 4, EBS. FO.
Row 5
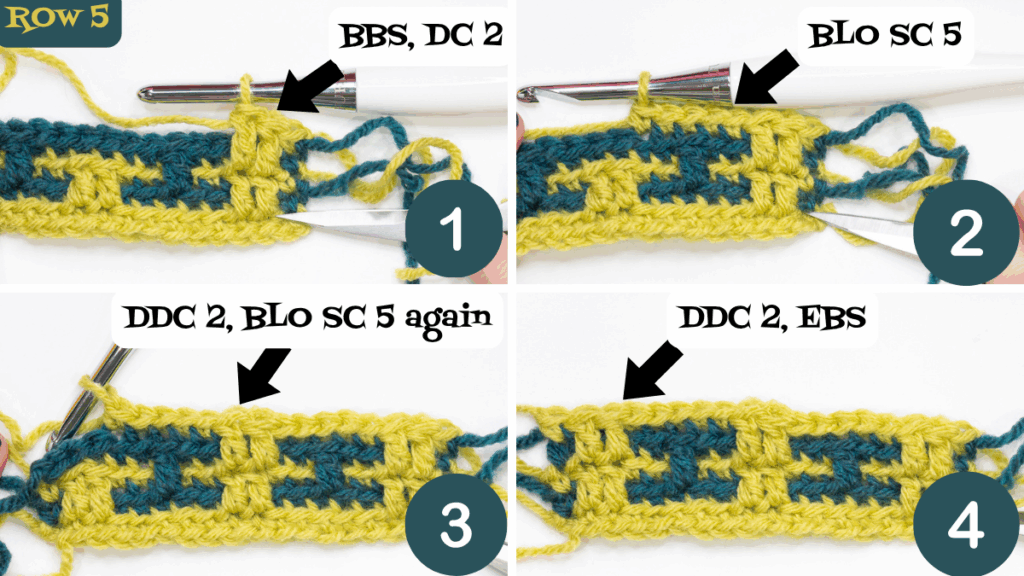
Row 5: With Color A, BBS, *DDC 2, BLO SC 5, repeat from * 1 more time. DDC 2, EBS. FO.
Row 6
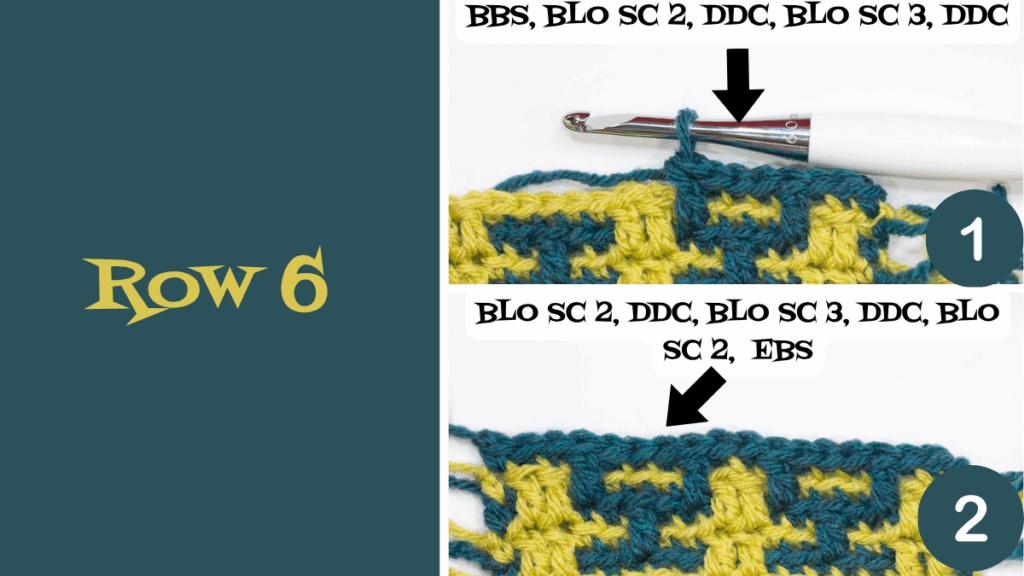
Row 6: With Color B, BBS, *BLO SC 2, DDC, BLO SC 3, DDC, repeat from * 1 more time, BLO SC 2, EBS. FO.
Rows 7 and Onwards
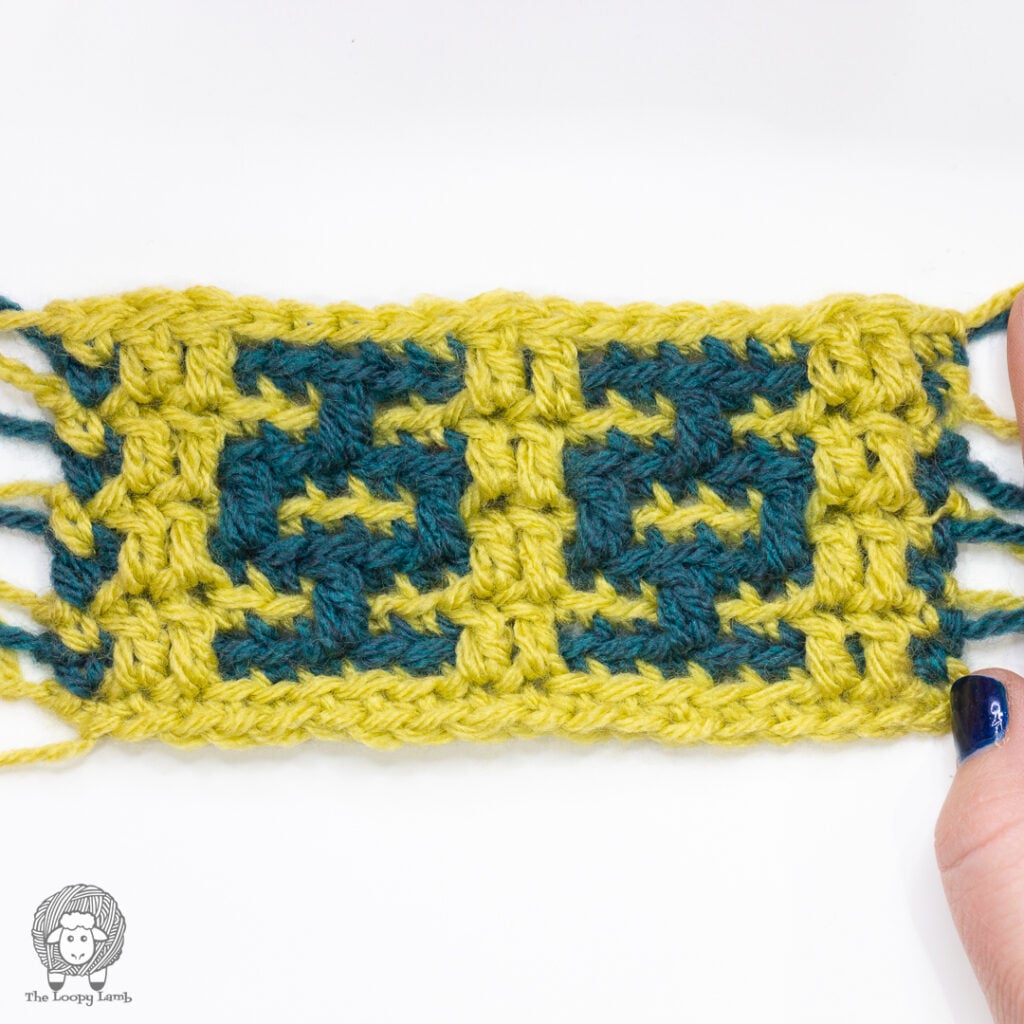
For Rows 7 on in our chart, you’ll repeat Rows 3 – 6. If you wanted to make the piece bigger, you would repeat Rows 3 – 6 as many times as you’d like. When. you’re ready to finish, I recommend doing one last repeat of Rows 3 – 5 to mirror your image and finish on the same color you started with.
Overlay Mosaic Crochet Tips for Success
- Choosing Colors: Use contrasting colors to make your mosaic pattern stand out.
- Tension Matters: Keep your drop-down dc stitches loose enough to avoid puckering.
- Reading the Chart: Always check the sides of the chart for color changes.
- Written Instructions vs. Charts: I recommend working with both a written pattern and a mosaic crochet chart for clarity when available.
Common Mistakes and How to Fix Them
- Misplaced Stitches: Double-check you’re working into the correct loops of the row and avoid working into the wrong loops.
- Gaps in the Design: Make sure your dropped double crochet stitches fully cover the lower rows. Pick up only the front loop of the indicated stitch. Do not work through the fabric.
- Incorrect Stitch Count: Always verify the number of stitches on each row.
- Uneven Tension with Dropped Stitches (How to Fix It) – Uneven tension can be a common challenge when working with dropped double crochet stitches in overlay mosaic crochet. If the tension is too tight, the fabric may pucker, while overly loose stitches can create gaps, disrupting the clean geometric design. If you find your DDC is pulling the fabric, undo it and try it again.
Causes of Uneven Tension:
- Pulling the yarn too tightly: This often happens when crocheters try to “force” the dropped stitch into place.
- Inconsistent stitch height: Dropped double crochet stitches should line up with the height of the BLO SC stitches in the current row.
- Holding the yarn too loosely: Loose tension can cause the double crochet stitches to sag, making the pattern look uneven.
How to Fix Uneven Tension:
- Relax Your Grip: Hold your yarn and hook with a comfortable, consistent grip. Avoid over-tightening as you work.
- Practice Stitch Height: Ensure your dropped double crochet stitches extend just far enough to cover the row below and up to the height of the BLO SC stitches in your current row without pulling.
- Check Your Gauge: Work a swatch before starting large projects to practice even stitch height and yarn tension.
- Use Consistent Yarn: Switching between yarn brands or fibers can sometimes affect tension. Stick to the same yarn type within a project if you’re really struggling with tension.
- By maintaining even tension, your overlay mosaic crochet fabric will lay flat and the intricate designs will appear crisp and well-defined. If you’re still struggling, consider using a blocking technique after finishing your project to smooth out minor tension inconsistencies.
Mosaic Crochet Patterns to Try:
- Illusion Confusion Beanie
- Resilient Links Cowl
- Pink Lemonade Overlay Mosaic Square (free pattern)
- Overlay Mosaic Granny Square Bag (free pattern)
FAQs
Overlay mosaic crochet is a colorwork technique that creates bold geometric designs using just two simple stitches: single crochet (worked in the back loop only) and drop-down double crochet (worked in the front loop of stitches in previous rows). You work with one color per row and the design builds up in layers on the front of the fabric.
Both techniques create beautiful mosaic-style patterns, but they work very differently. Here are the main differences:
How Color Is Worked
Overlay Mosaic Crochet: You work one color per row and fasten off at the end of every row.
Inset Mosaic Crochet: Each color is worked over two rows before switching.
Turning Your Work
Overlay Mosaic Crochet: You never turn your work. The right side is always facing you.
Inset Mosaic Crochet: You turn your work at the end of every row.
Where Stitches Are Worked
Overlay Mosaic Crochet: Drop-down stitches are worked into the front loops of stitches one row below, sitting on top of the previous row’s stitches to create the design.
Inset Mosaic Crochet: Drop-down stitches are worked under both loops of skipped stitches two rows below. These stitches are worked into chain spaces, so the design is “inset” into the fabric instead of layered on top.
Both techniques are wonderful, but overlay mosaic crochet tends to create crisper, more defined designs with a more solid fabric.
Yes! Even though the finished projects look complex, overlay mosaic crochet only uses basic crochet stitches. If you can single crochet and double crochet, you already have the skills you need to get started
When working overlay mosaic crochet in rows, yes. Typically the yarn is fastened off at the end of each row. Don’t worry though! Those yarn tails can be easily managed with techniques like envelope borders or fringe.
That’s completely normal! Overlay mosaic crochet creates its design on the right side of the fabric only. The back will have horizontal color stripes instead of the pattern. This is just part of how the technique works.
Ready to Start? Share Your Projects!
I’d love to see your overlay mosaic crochet projects! Share your progress with me on social media and tag me on Instagram using #theloopylamb. Don’t forget to subscribe to my YouTube channel for more crochet techniques, and let me know in the comments—what’s your favorite type of mosaic crochet?
Join The Loopy Lamb Crochet Community Facebook Group to connect with other crafty friends and share your fabulous projects made with this pattern.
Don’t forget to follow me on your favorite social media channels so you always know when crochet product reviews, crochet tutorials, new free crochet patterns are posted here on the blog as well as sneak peeks and crochet inspiration. Happy Crocheting friends!
Facebook Page: www.facebook.com/TheLoopyLamb
Instagram: www.instagram.com/TheLoopyLamb
YouTube: The Loopy Lamb YouTube Channel
TikTok: www.tiktok.com/@theloopylamb
Pinterest: www.pinterest.com/theloopylamb
Become a Newsletter Subscriber: Sign Up for the newsletter here.


Thank you for these explicit instructions. I look forward to doing this stitch.
You’re welcome! I hope you enjoy doing it.