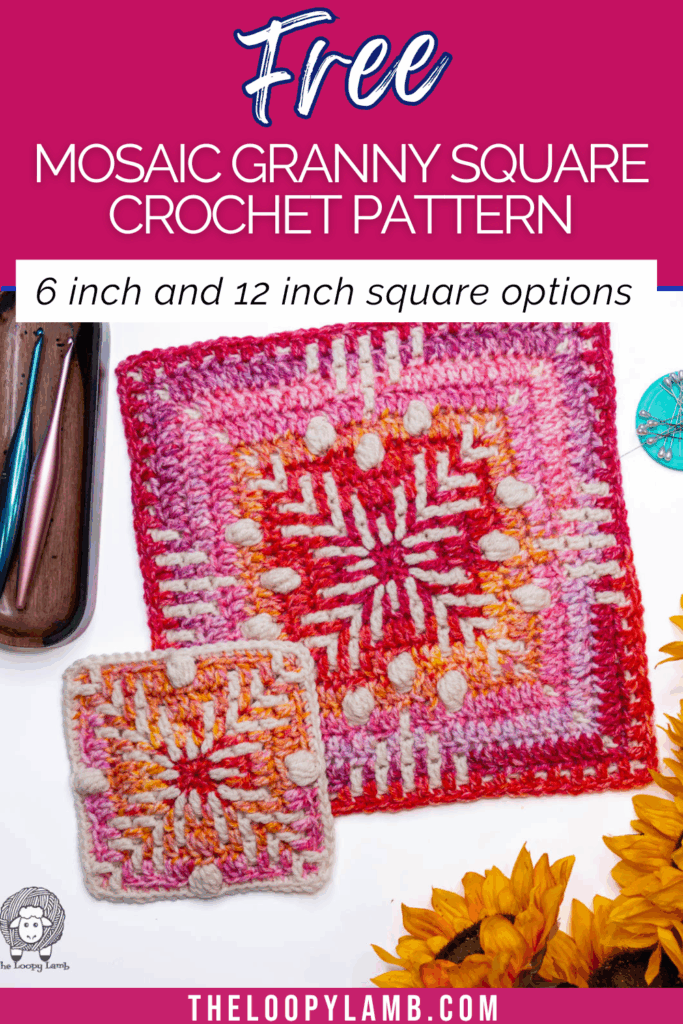
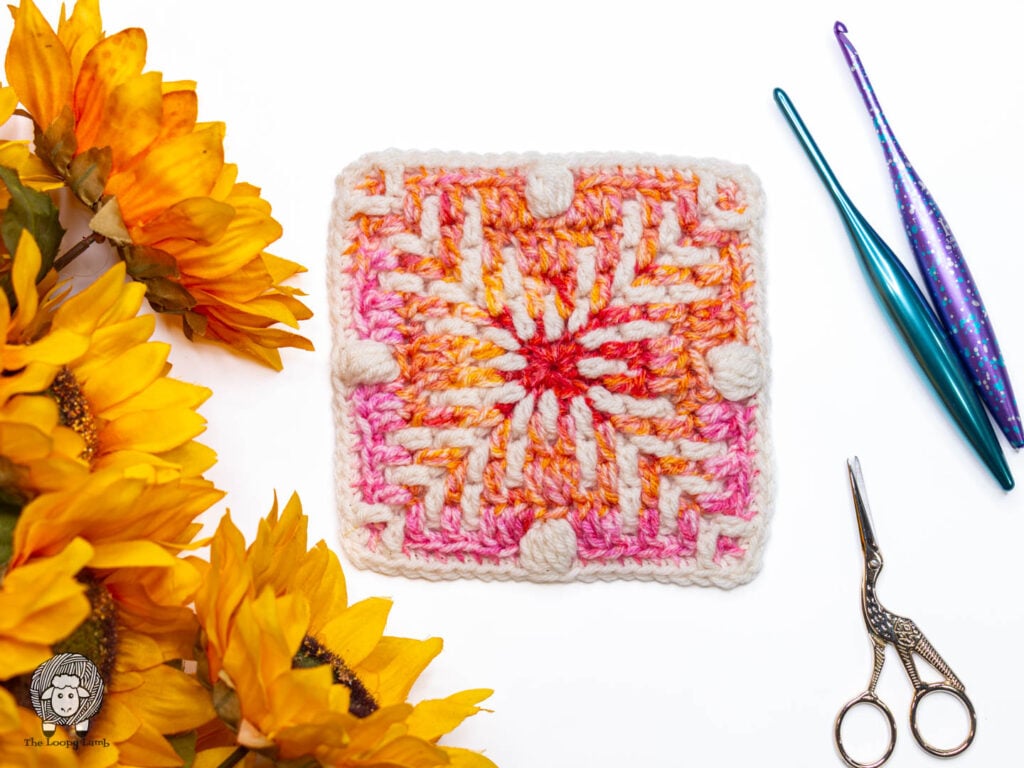
If you have been looking for overlay mosaic crochet patterns to try but don’t know where to start, you’re in the right place. My Pink Lemonade mosaic granny square crochet pattern is an easy way to try overlay mosaic crochet without committing to a full blanket. Available in both 6 inch and 12 inch square options, you have the option to choose whichever size you’d like to make projects like bags, scarves or even a mosaic crochet blanket.
In this blog post you’ll find the written pattern for both size options, tips and tricks for making your square as well as an overlay mosaic crochet colorwork chart to help you visualize the stitches.
Pin This Free Pattern to Save It For Later Save It
*This post may contain affiliate links, which means that I may earn a small commission from qualifying purchases made through these links at no extra cost to you. All opinions are my own.*

Pink Lemonade Mosaic Granny Square (Ad-Free PDF)

Want a clean, ad-free version of this pattern you can use anywhere?
This printable PDF includes the full Pink Lemonade Mosaic Granny Square pattern with clear, step-by-step instructions, round-by-round pictures, large format chart and formatting designed for easy printing or tablet use.
Table of contents
- What is Overlay Mosaic Crochet?
- Is This Pattern Beginner-Friendly?
- What is a Mosaic Granny Square and How It Differs from Traditional Granny Squares
- How This Mosaic Granny Square is Constructed
- What Can You Make with Mosaic Granny Squares?
- Why You’ll Love This Square Pattern
- You’ve Got Options Crochet Along
- Disclaimer
- Skill Level:
- Terminology:
- Supplies :
- Abbreviations:
- Pink Lemonade Mosaic Granny Square Crochet Pattern Instructions (both sizes)
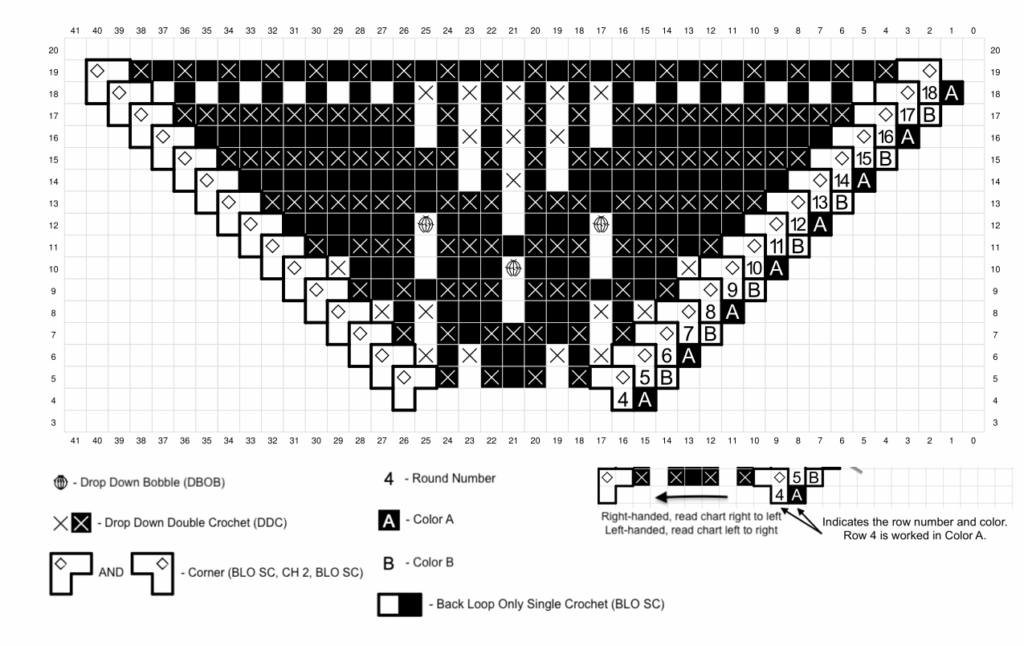
- Pink Lemonade Mosaic Granny Square Colorwork Chart
- Frequently Asked Questions
What is Overlay Mosaic Crochet?
Overlay mosaic crochet is a crochet colorwork technique that uses single crochets and double crochet stitches to create graphic images and patterns. It is so much fun and much easier than it looks. If you are able to work a single crochet and double crochet stitch, you can do this technique. This technique traditionally uses two yarn colors and one yarn color is worked per row/round.
Overlay vs Inset Mosaic Crochet
Overlay mosaic crochet uses drop down stitches worked into previous rows to create bold graphic designs. Inset mosaic crochet uses color changes and stitches worked into chain spaces to create a different style of fabric.
This square uses the overlay method, which creates a beautiful design that is cozy and easy to do.
Is This Pattern Beginner-Friendly?
If you can single crochet and double crochet, you can make this square. Overlay mosaic crochet looks complicated, but it’s built from simple stitches worked in a specific order.
This square is intentionally designed to:
- Use only two colors
- Follow a consistent stitch rhythm on each side of the square
- Include both written instructions and a chart
What is a Mosaic Granny Square and How It Differs from Traditional Granny Squares
A mosaic granny square is a crochet blanket square (sometimes called an afghan square) that is made using the mosaic crochet colorwork technique. There are a few different mosaic crochet techniques and this pattern uses the overlay mosaic crochet technique, which in my opinion, is the easiest to learn and do. It differs from traditional granny squares in that it uses a special colorwork technique and does not utilize the crochet granny stitch (though, if you want to learn how to do that granny stitch I have a tutorial here that can help you learn).
How This Mosaic Granny Square is Constructed
This pattern is worked from the center-out in joined rounds. We use one color per round and the drop down stitches create the image on our square. To add a pop of texture, we will use some bobble stitches in a few rounds.
What Can You Make with Mosaic Granny Squares?
There are lots of things that you can make when you combine individual squares to make something larger. Some things you can make with granny squares are:
- Blankets
- Scarves
- Hats
- Sweaters
- Tea Cozies
- Bags and pouches
- Pillow covers
- and more!
Why You’ll Love This Square Pattern
- Great first overlay mosaic project
- Works up quickly
- Only uses two colors
- Includes a colorwork chart
- Available in two sizes
- Has an added pop of texture
The bold design and soft pink tones make this mosaic granny square perfect for spring blankets, tote bags or a modern statement pillow.

You’ve Got Options Crochet Along
The Pink Lemonade Mosaic Granny Square crochet pattern is released as part of the You’ve Got Options Crochet Along. If you love making crochet squares, you’ll love this crochet along with CAL Central. This fun community crochet along includes 12 free crochet square patterns designed by your favorite designers. Each pattern is written for a 12 inch granny square with an option to stop at a 6 inch square, giving you the flexibility to create your squares the way you want.
Every Monday from January 5 through March 23, 2026, CAL Central Crochet will share a new free square pattern. You can chat and crochet along with others in the CAL Central Facebook group or Ravelry group, share your projects, and enter the end-of-CAL giveaway featuring six different prizes. Giveaway entries close on Sunday March 29, 2026 at 11:59 pm Eastern.
When you share, use #OptionsCAL and #CALCentralCrochet so we can see them too!
Prizes generously donated by: Forbidden Fiber Co., GlassEyesOnline, Knitter’s Relief Balm, LennyMudPottery, MBT Creates, and Unicorn.
Disclaimer
This pattern is © Ashley Parker of The Loopy Lamb. You’re welcome to sell finished product made using it, I kindly request that you credit The Loopy Lamb as the pattern designer and link to https://theloopylamb.com. This pattern is for personal use only. Please don’t copy, share, or repost the pattern itself, translate or alter it, or use my photos. Video tutorial creation using this pattern is strictly prohibited.
Thank you for supporting independent designers by viewing this pattern right here on my blog. It helps me keep sharing free patterns with you.
Skill Level:
- Easy
Terminology:
- US Terms
Supplies:
- 5.5 mm (I) Crochet Hook (or size needed to match gauge)
- Red Heart Super Saver Bitty Stripes (100% Acrylic, Worsted (4), 515 yd/471 m, 283 g/10 oz), in the following colors and quantities:
- Color A: Pink Lemonade – 1 skein
- 6 in square: (approx. 24 yd/13 g)
- 12 in square (approx. 102 yd/56 g)
- Color A: Pink Lemonade – 1 skein
- Red Heart Super Saver (100% Acrylic, Worsted (4), 364 yd/333 m, 198 g/7 oz),
- Color B: Aran – 1 skein
- 6 in square: (approx. 24 yd/13 g)
- 12 in square (approx. 67 yd/36 g)
- Color B: Aran – 1 skein
- Scissors
- Tapestry Needle
- Stitch Markers
- Blocking Materials (blocking mat, pins, garment steamer)
Abbreviations:
- BLO = Back Loop Only
- CH(s) = Chain(s)
- DBOB = Drop Down Bobble
- DDC = Drop Down Double Crochet
- FLO = Front Loop Only
- FO = Finish Off
- MC = Magic Circle
- Rep = Repeat
- Rnd(s) = Round(s)
- RS = Right Side
- RSSCC = Reverse Slip Stitch Color Change
- SC = Single Crochet
- SK = Skip
- SL ST = Slip Stitch
- SP(s) = Space(s)
- ST(s) = Stitches
- YO = Yarn Over
Special Stitches & Techniques:
- Drop Down Double Crochet (DDC): Work a double crochet into the front loop of the stitch in the same color two rows below, skipping the stitch directly behind on the current row. Note: In Rnd 3 DDC is used but will connect to Color A instead of the same color. This is the only place in the pattern this exception is made.
- Drop Down Bobble (DBOB): *YO and insert hook under the front loop of the stitch in the same color two rows below. YO and pull up a loop (3 loops on hook). YO and pull through the first two loops on your hook (2 loops on hook). Repeat from * 4 more times (6 loops on hook). YO and pull through all 6 loops on your hook to complete the stitch. Skip the stitch directly behind on the current row. Use your finger to pop the bobble to the RS of the fabric.
- Invisible Finish/Join: FO leaving a long tail. Thread the tail onto a tapestry needle. Place the tapestry needle through the top of the 2nd ST from front to back and pull through. Place the tip of the needle into the top of the last ST of the round, under the back loop of the ST and pull through to the back of the work. Weave in the end. Find a tutorial here: https://theloopylamb.com/invisible-finish-crochet-tutorial/
- Reverse Slip Stitch Color Change (RSSCC): Remove the working loop in the current color from your hook and insert the hook from the back of the fabric through to the front through the first ST of the round. Place the working loop of the current color back on the hook pulling it through the ST to the back of the fabric. YO with the new color and pull through the loop on your hook. YO and CH 1 to secure.
Finished Sizes:
- 6 in and 12 in squares
Gauge:
- Rnds 1 – 9 = 4 in square (crocheted using the pattern as written and measured on the wrong side of the fabric)
Notes:
- Gauge is not vital for this project. You may substitute a different yarn and hook size. Any change in gauge will affect the finished size of the project and the amount of yarn required.
- This square is worked from the center-out in joined rounds. The right side of the fabric should always be facing you. Do NOT turn your work at the end of rounds.
- The overlay mosaic crochet chart starts on Round 4. The chart and written instructions should be used in tandem, as the chart shows only the pattern repeat.
- In Overlay Mosaic Crochet, you work one row/round of color at a time. This means that you will be changing colors at the end of every round after Round 2. Color changes are made using the Reverse Slip Stitch Color Change (See Special Stitches & Techniques). To avoid weaving in ends, after completing the color change, leave the old color attached and pick it back up when needed next, carrying the yarn up the back of the square. Alternatively, you can cut each color when finished with it and weave in the ends.
- How to Read the Written Pattern Instructions: The number indicated next to the instructions (i.e., DDC 7) means you’ll work a Drop Down Double Crochet stitch in the next 7 stitches. Where no number is indicated (i.e., DDC) you will work a single Drop Down Double Crochet stitch in the next stitch only.
- Instructions in Brackets: i.e. [DDC, BLO SC 2] x 4 means that you’ll work a Drop Down Double Crochet in the first stitch, then Back Loop Only Single Crochet in each of the next two stitches. You’ll then repeat those instructions 3 more times (for a total of 4).
- Instructions in Brackets: i.e. [DDC, BLO SC 2] x 4 means that you’ll work a Drop Down Double Crochet in the first stitch, then Back Loop Only Single Crochet in each of the next two stitches. You’ll then repeat those instructions 3 more times (for a total of 4).
- Reading the Chart: The chart is to be read from right to left for right-handed crocheters and left to right for left-handed crocheters.
- The symbol next to each round number in the chart indicates the color to use for that row.
- The chart found includes a legend for all symbols used.
- The symbol next to each round number in the chart indicates the color to use for that row.
- Tip 1: If you’re having trouble finding the FLO of the corner chains, place a stitch marker in the FLO of those stitches to help you locate them in the next round. Move the markers up after each round.
- Tip 2: In rounds where many DC stitches are worked in a row (like Rnd 15), it is normal to see flaps forming on the WS of your fabric. To minimize their appearance, in later rounds when working a BLO SC, insert your hook through the BLO of the indicated stitch and through the BLO of the stitch directly behind it in the same color from two rounds below. Then work your SC as normal, making sure to pull your loop up to the height of the current round before completing the stitch. Working this modified stitch every few stitches will help secure the flaps and hold them down.
- Round-by-Round photos can be found in the printable PDF version of this pattern available on Ravelry and Etsy.
Pink Lemonade Mosaic Granny Square Crochet Pattern Instructions (both sizes)
Rnd 1: With Color A make a MC. *SC 3 into the MC, CH 2, rep from * 3 more times. Join to BLO of the first ST with a SL ST. (12 STs, 4 CH 2 SPs)
Rnd 2: CH 1. *BLO SC 3, working in the CHs of the CH 2 SP, (BLO SC, CH 2, BLO SC) (from here on out referred to as “Corner”, rep from * 3 more times. RSSCC to Color B. (20 STs, 4 CH 2 SPs)
Rnd 3: (In this rnd ONLY, the DDC sts connect to Color A (not B). This is an exception.) CH 1, [BLO SC, DDC] x 2, Corner, *[DDC, BLO SC] x 2, DDC, Corner, rep from * 2 more times, DDC. RSSCC to Color A. (28 STs, 4 CH 2 SPs)
Rnd 4: [DDC, BLO SC] x 2, DDC, Corner, *[DDC, BLO SC] x 3, DDC, Corner, rep from * 2 more times, DDC, BLO SC. RSSCC to Color B. (36 STs, 4 CH 2 SPs)
Rnd 5: BLO SC 3, DDC, BLO SC, DDC, Corner. *DDC, BLO SC, DDC, BLO SC 3, DDC, BLO SC, DDC, Corner, rep from * 2 more times, DDC, BLO SC, DDC. RSSCC to Color A. [44 STs, 4 CH 2 SPs)
Rnd 6: DDC 3, [BLO SC, DDC] x 2, Corner, *[DDC, BLO SC] x 2, DDC 3, [BLO SC, DDC] x 2, Corner, rep from * 2 more times, [DDC, BLO SC] x 2, RSSCC to Color B. (52 STs, 4 CH 2 SPs)
Rnd 7: SC 5, DDC, BLO SC, DDC, Corner, *DDC, BLO SC, DDC, BLO SC 7, DDC, BLO SC, DDC, Corner, rep from * 2 more times, DDC, BLO SC, DDC, BLO SC 2. RSSCC to Color A. (60 STs, 4 CH 2 SPs)
Rnd 8: DDC, BLO SC, DDC 3, [BLO SC, DDC] x 2, Corner, *[DDC, BLO SC] x 2, DDC 3, BLO SC, DDC 3, [BLO SC, DDC] x 2, Corner, rep from * 2 more times. [DDC, BLO SC] x 2, DDC 2. RSSCC to Color B. (68 STs, 4 CH 2 SPs)
Rnd 9: BLO SC, DBOB, BLO SC 7, DDC, Corner, *DDC, BLO SC 7, DBOB, BLO SC 7, DDC, Corner, rep from * 2 more times, DDC, BLO SC 6. (76 STs, 4 CH 2 SPs)
For 6 in square, FO using invisible join and weave in ends. Block to 6 in.
For 12 in square, RSSCC to Color A and proceed to follow instructions for Rnds 10 – 18.
Rnd 10: DDC, BLO SC, [DDC 3, BLO SC] x 2, DDC, Corner, *DDC, [BLO SC, DDC 3] x 4, BLO SC, DDC, Corner, rep from * 2 more times, DDC, BLO SC, DDC 3, BLO SC, DDC 2. RSSCC to Color B. (84 STs, 4 CH 2 SPs)
Rnd 11: BLO SC 5, DBOB, BLO SC 6, Corner, *BLO SC 6, DBOB, BLO SC 7, DBOB, BLO SC 6, Corner, rep from * 2 more times, BLO SC 6, DBOB, BLO SC 2, RSSCC to Color A. (92 STs, 4 CH 2 SPs)
Rnd 12: DDC, BLO SC, DDC 3, BLO SC, DDC 7, Corner, *DDC 7, [BLO SC, DDC 3] x 2, BLO SC, DDC 7, Corner, rep from * 2 more times. DDC 7, BLO SC, DDC 2. RSSCC to Color B. (100 STs, 4 CH 2 SPs)
Rnd 13: BLO SC, DDC, BLO SC 12, Corner, * BLO SC 12, DDC, BLO SC 12, Corner, rep from * 2 more times, BLO SC 11, RSSCC to Color A. (108 STs, 4 CH 2 SPs)
Rnd 14: [DDC, BLO SC] x 2, DDC 11, Corner, *DDC 11, [BLO SC, DDC] x 2, BLO SC, DDC 11, Corner, rep from * 2 more times, DDC 11, BLO SC. RSSCC to Color B. (116 STs, 4 CH 2 SPs)
Rnd 15: [BLO SC, DDC] x 2, BLO SC 12, Corner, *BLO SC 12, [DDC, BLO SC] x 2, DDC, BLO SC 12, Corner, rep from * 2 more times. BLO SC 12, DDC. RSSCC to Color A (124 STs, 4 CH 2 SPs)
Rnd 16: [DDC, BLO SC] x 3, DDC 11, Corner, *DDC 11, [BLO SC, DDC] x 4, BLO SC, DDC 11, Corner, rep from * 2 more times, DDC 11, BLO SC, DDC, BLO SC. RSSCC to Color B. (132 STs, 4 CH 2 SPs)
Rnd 17: [BLO SC, DDC] x 3, BLO SC 12 Corner, *BLO SC 12, [DDC, BLO SC] x 4, DDC, BLO SC 12, Corner, rep from * 2 more times, BLO SC 12, DDC, BLO SC, DDC. RSSCC to Color A. (140 STs, 4 CH 2 SPs)
Rnd 18: [DDC, BLO SC] x 9, DDC, Corner, *[DDC, BLO SC] x 17, DDC, Corner, rep from * 2 more times, [DDC, BLO SC] x 8. (148 STs, 4 CH 2 SPs)
FO using invisible join (See Special Stitches & Techniques). Weave in ends. Block to 12 in.

Pink Lemonade Mosaic Granny Square Colorwork Chart
Want to turn your square into a crochet bag? Check out my Pink Lemonade Mosaic Granny Square Bag Pattern & Tutorial.
Frequently Asked Questions
Blocking is optional however, it can help give the square straighter edges, help it stay flatter and set the stitches nicely. If your square is slightly shy of the given sizing, blocking will relax the fabric and can help it get closer to the desired measurement.
You can use any worsted weight (4) yarn you choose. However, keep in mind that different yarns may affect the size of your finished square so make sure to check your measurements as you go if you’re needing the square to be the expected size.
Yes. Because stitches are worked over previous rounds, the fabric is slightly thicker and more structured than traditional granny squares.
No. You can carry your yarn up the back of the square to avoid having to weave in so many yarn ends. After swapping to your new yarn color, leave the unused color hanging off the back of your project until you are ready to use it again. Pick it back up, making sure not to pull too tightly and use it when you’re ready.
Absolutely! By making multiple squares, you can join them together to make a mosaic blanket. How many you’ll need depends on the size of your blanket and the size of your mosaic granny squares.
There are lots of ways to join crochet squares and it’s up to your personal preference which you use. You can sew them together with a mattress or whip stitch if you don’t mind hand sewing. If you prefer to crochet them together, you can join them using a slip stitch or single crochet. To join them, line the squares up so that the stitches along the edges line up and either sew or crochet through the stitches until they are joined. Check out my Pink Lemonade Mosaic Bag Tutorial to see how I join my squares to make a purse or tote bag.
That’s it! I hope you enjoyed making your Pink Lemonade Mosaic Granny Square! Let me know in the comments what size square you used and what you’re planning to use your squares for. I love to hear what you are making.
Looking for other granny square patterns to try? Checking my Perpetual Fog and Lavender Fields blanket square patterns.
If you post pictures of your finished mosaic granny squares on social media, I’d love to cheer you on and share your post with our community! Tag me @theloopylamb or use #theloopylamb so I can see your adorable creations and maybe even feature you in my stories.
Join The Loopy Lamb Crochet Community Facebook Group to connect with other crafty friends and share your fabulous projects made with this free mosaic granny square crochet pattern! Don’t forget to follow me on social media so you always know when new youtube tutorials and other new free crochet patterns are released. Happy Crocheting!
Facebook Page: www.facebook.com/TheLoopyLamb
Instagram:www.instagram.com/TheLoopyLamb
YouTube: The Loopy Lamb YouTube Channel
TikTok: www.tiktok.com/@theloopylamb
Pinterest:www.pinterest.com/theloopylamb
Newsletter: Sign up for my newsletter!