Learn how to crochet a pig with my new, adorable free crochet pig pattern!
This piggy pattern was designed to minimize sewing and uses basic crochet stitches so it is accessible to beginners.
We’ll be using a few special techniques in this project but I have video tutorials to help walk you through those techniques so you’ll be a pro using them and have your cute pig finished in no time.
Pin this Free Crochet Pig Pattern for later Save
Add this to your Ravelry Queue
*This post may contain affiliate links, which means that I may earn a small commission from qualifying purchases made through these links at no extra cost to you. All opinions are my own.*
Grab a printable, ad-free PDF version of this pattern in my Ravelry and Etsy shops.

The Yarn
The recommended yarn for this pattern is Brava Worsted Weight Yarn from WeCrochet. Brava is one of my favorite acrylic yarns and it comes in a wide variety of colors.
The colors that I used for this project are called Ash Heather and Cotton Candy.
Other worsted weight yarns of your preference can be substituted for Brava.
As with many amigurumi projects, this crochet pig can be made with almost any yarn you’d like and gauge isn’t vital to the project. Just make sure if you use a different yarn weight with this free amigurumi pattern, that you change up your hook size.
I.e. If you use a bigger yarn, you’ll need a bigger hook.
Want a Larger Version of this Crochet Pig Pattern?
I’ve been getting a lot of requests from folks for the same amigurumi projects in various sizes. As a result, I have created a larger version of this crochet pig pattern named Patsy Swine.
Patsy Swine is this little pig’s mama pig and is the perfect cuddle-sized amigurumi pig.
The pattern for the large crochet pig, Patsy Swine can be found in my Ravelry and Etsy shops on its own or get both crochet pig patterns for a squealin’ special pricein the Piggin’ Out Bundle on Ravelry or Etsy.

Check out these great amigurumi patterns:


Disclaimer:
Feel free to sell the item created by this free pig crochet pattern but please provide pattern credit back to me when posting online, and please provide a link to my blog: https://theloopylamb.com. This pattern is for your own personal use and is not to be mass-produced. Please do not resell, distribute, duplicate, or share this pattern in any printed or digital form (including video tutorials), or claim this pattern as your own original design. Please do not use my photos when selling your finished items.

Skill Level:
- Easy
Terminology
- U.S. Terminology
Supplies:
- E / 3.5 mm Crochet Hook
- WeCrochet Brava Worsted Weight Yarn (100% Premium Acrylic, Worsted Weight (4), 218yds/200m, 100g/3.5oz), 1 skein each of:
- Color A: Asphalt Heather / Grey or Black Yarn (approx. 16 yds/15 m (0.25oz/7g))
- Color B: Cotton Candy / Pink Yarn (approx. 109 yds/100 m (1.8 oz/50g))
- 2 – 12 mm Safety Eyes (Black)
- Poly-fil Polyester Fiberfill Stuffing
- Tapestry Needle / Yarn Needle
- Multiple Stitch Markers
- Scissors
Abbreviations:
- BLO – Back Loop Only
- CH – Chain
- DC – Double Crochet
- FLO – Front Loop Only
- FO – Finish Off
- HDC – Half Double Crochet
- MC – Magic Circle / Magic Ring
- PM – Place Marker
- SC(s) – Single Crochet(s)
- SCDEC – Single Crochet Decrease
- SCINC – Single Crochet Increase / 2 Single Crochet Stitches Worked Into the Same Stitch
- SL ST – Slip Stitch
- ST(s) – Stitch(es)
- YO = Yarn Over
Special Stitches & Techniques:
- Invisible Finish/Join: FO leaving a long tail. Thread the tail onto a tapestry needle. Place the tapestry needle through the top of the 2nd ST from front to back and pull through. Place tip of needle into top of the last ST of the round, under the back loop of the stitch, and pull through to the back of the work. Weave in the end. Check out my Invisible join tutorial.
- Single Crochet (SC) Join: With a slip knot already on the hook, insert hook into the designated stitch. YO and pull up a loop. YO and pull through both loops on the hook. Find a tutorial for this here: https://theloopylamb.com/how-to-do-the-single-crochet-join-for-cleaner-yarn-joins/
Finished Size:
- Approximately 10 inches tall from top of ears to bottoms of legs
Gauge:
- 9 sts across x 11 rows = 2”
NOTES:
- Gauge is not vital to the project but please keep in mind that by not matching gauge, this may affect how much yarn is needed as well as the size of your toy. Keep a consistent tension throughout your project to ensure the pieces fit together properly.
- A 3.5 mm hook is recommended for this project when paired with this yarn however, if you find that your fabric has holes in it and stuffing is showing through, adjust your crochet hook size until you are able to create a tight, dense fabric free of holes.
- Instructions within the brackets () are to be repeated the number of times specified next to the brackets.
- All parts of the project are worked in continuous rounds, except the Tail. Do not join at the end of the row, unless indicated. A stitch marker is used to keep track of the beginning of the round.
- Stitch placement is important in amigurumi patterns. I recommend taking the time to ensure you have the correct number of stitches before moving on to the next round.
- Color changes are done using the last YO of the previous ST.
- Place scrap pieces of yarn or stitch markers into the stitches for the safety eyes until you have crocheted past that point far enough to insert the safety eyes with the backs on them without them getting in the way of your crocheting.
- For a cleaner SCDEC, do your SCDEC under the front loops only of the stitch rather than under both loops. This is often referred to as an invisible decrease. Check out my invisible decrease tutorial.
- The CH 2 chain stitches in Round 1 of the Body is counted as included in the stitch count since you work into one side of the chain, the unworked side is counted as stitches since they will be worked into in the next round.
Here’s a video tutorial you may find helpful for starting this project:

Prefer an ad-free experience? Grab a printable, ad-free PDF version of this pattern in my Ravelry and Etsy shops.
Free Crochet Pig Pattern – Piggie Smalls:
First Leg:
Round 1: Using Color A, make a MC and SC 6 into the MC. (6)
Round 2: (SCINC) x 6. (12)
Round 3: (SC, SCINC) x 6. (18)
Rounds 4 – 6: SC around. (18)
FO using invisible join. Attach Color B to first ST of Round 6 with a SL ST and CH 1 or an SC Join (see special stitches and techniques or video tutorial below))


Round 7: In BLO, SC around. (18)
Rounds 8 – 13: SC around. (18)
FO. PM in the first ST of Round 13.

Second Leg:
Round 1: Using Color A, make a MC and SC 6 into the MC. (6)
Round 2: (SCINC) x 6. (12)
Round 3: (SC, SCINC) x 6. (18)
Rounds 4 – 6: SC around. (18)
FO using invisible join (see special stitches & techniques). Attach Color A to first ST of Round 6 with a SL ST and CH 1 or an SC Join (see special stitches and techniques)
Round 7: In BLO, SC around. (18)
Rounds 8 – 13: SC around. (18)
Do NOT FO. We will continue onto the Body. Stuff the Legs and continue to add stuffing every few rounds of the Body.
Body & Head
Round 1: CH 2, SC in the 1st ST of Leg 1. SC 17, SC in each of the CHs of your CH 2, SC 18 around Leg 2. PM in 1st CH of CH 2 to mark new 1st ST of the round. (40)
Round 2: SC in each CH and ST around. (40)
Round 3: (SC 4, SCINC) x 8. (48)
Round 4: SC around. (48)
Round 5: (SC 6, SCDEC) x 6. (42)
Rounds 6 – 7: SC around. (42)
Round 8: (SC 5, SCDEC) x 6. (36)
Rounds 9 – 11: SC around. (36) – continue stuffing throughout the body and head every few rows.
Round 12: SC 2, SCDEC, (SC 4, SCDEC) x 5, SC 2. (30)
Rounds 13 – 14: SC around. (30)
Round 15: (SC 3, SCDEC) x 6. (24)
Rounds 16 – 18: SC around. (24)
Round 19: SC, SCDEC, (SC 2, SCDEC) x 5, SC. (18)
Round 20: SC around. (18)
Round 21: SC, SCINC, (SC 2, SCINC) x 5, SC. (24)
Round 22: (SC 3, SCINC) x 6. (30)
Round 23: SC 2, SCINC, (SC 4, SCINC) x 5, SC 2. (36)
Round 24: (SC 5, SCINC) x 6. (42)
Rounds 25 – 35: SC around. (42) – Insert safety eyes Round 32 with 5 STS between them
Round 36: (SC 5, SCDEC) x 6. (36)
Round 37: SC 2, SCDEC, (SC 4, SCDEC) x 5, SC 2. (30)
Round 38: (SC 3, SCDEC) x 6. (24)
Round 39: SC, SCDEC, (SC 2, SCDEC) x 5, SC. (18)
Round 40: (SC, SCDEC) x 6. (12)
Round 41: (SCDEC) x 6. (6)
FO. Weave your yarn tail through the FLO of the last round and cinch the hole closed (see Ultimate Finish video below for assistance). Weave in ends.


Snout
Using Color B, CH 5.
Round 1: SCINC in the 2nd CH from the hook, SC 2, work 5 SCs in the last CH. Working on the other side of the CH, SC 2, work 3 SCs in the last CH. (14)
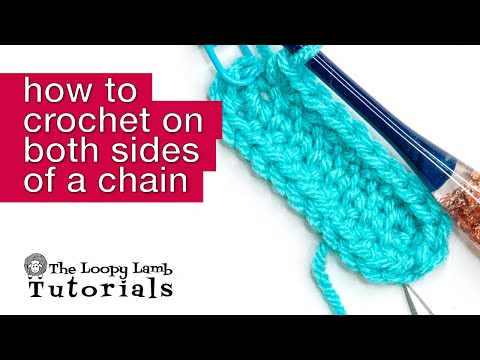
Need help crocheting on both sides of the foundation chain? Check out this video below for help.
Arms (Make 2)
Round 1: Using Color A, make a MC and SC 6 into the MC. (6)
Round 2: (SCINC) x 6. (12)
Rounds 3 – 5: SC around. (12) – start stuffing, adding more stuffing with each added round.
FO using invisible join (see special stitches & techniques). Attach Color B to first ST of Round 8 with either a SL ST and CH 1 or an SC Join (see special stitches & techniques).
Round 6: In BLO, SC around. (12)
Rounds 7 – 15: SC around. (12)
Round 16: (SCDEC) x 6. (6)
FO leaving a long tail of yarn. Use the yarn tail to sew the top of the arm closed and sew onto either side of the Body. Weave in ends.
Ears (Make 2)
Round 1: Using Color B, make a MC and SC 6 into the MC. (6)
Round 2: SC around. (6)
Round 3: (SC, SCINC) x 3. (9)
Round 4: (SC 2, SCINC) x 3. (12)
Round 5 – 6: SC around. (12)
Round 7: (SC 2, SCDEC) x 3. (9)
Round 8: (SC, SCDEC) x 3. (6)
FO leaving a long yarn end to sew onto the Head. Flatten piece, do not stuff.
Sew Ears onto top of the Head working through both sides of the open edge of the Ear to secure it to the Head.
Weave in ends.

Tail
Row 1: Using Color B, CH 10. SC 3 into the 2nd CH from the hook, SC 3 into the next two CHs, HDC 3 into each of the next 3 CHs, DC 3 into each of the next 3 CHs. (27)
FO leaving a long yarn tail.
Thread the yarn tail onto a tapestry needle and sew the Tail to the bum of the pig.
Weave in ends.
That’s it! I hope you had so much fun learning how to crochet a pig using my free crochet pig pattern!
I’d love to see your finished projects made with this free crochet pattern so if you’re posting a picture of your project on social media, please tag me or use #theloopylamb so that I can see your lovely work and possibly feature it in my stories.
While you’re here, check out these other great free crochet patterns available here on The Loopy Lamb:
- Crochet Crab Mug Rug Free Pattern
- Monstera Leaf Crochet Mug Rug Pattern
- Easy Crochet Doll Pattern – My Girl Pearl
- Pawsitively Cozy Crochet Cat Bed
- Or check out all my other free crochet patterns.


Join The Loopy Lamb Crochet Community Facebook Group to connect with other crafty friends and share your fabulous crochet project made with this wonderful pattern.
Don’t forget to follow me on the various social channels so you always know when crochet product reviews, crochet tutorials, giveaways and new free patterns for amiguurmi toys are posted here on the blog. Happy Crocheting friends!
Facebook: www.facebook.com/TheLoopyLamb
Instagram: www.instagram.com/TheLoopyLamb
YouTube: The Loopy Lamb YouTube Channel
Pinterest: www.pinterest.com/theloopylamb
Newsletter: Sign up for my newsletter!


1 thought on “Easy Free Crochet Pig Pattern – Piggie Smalls”