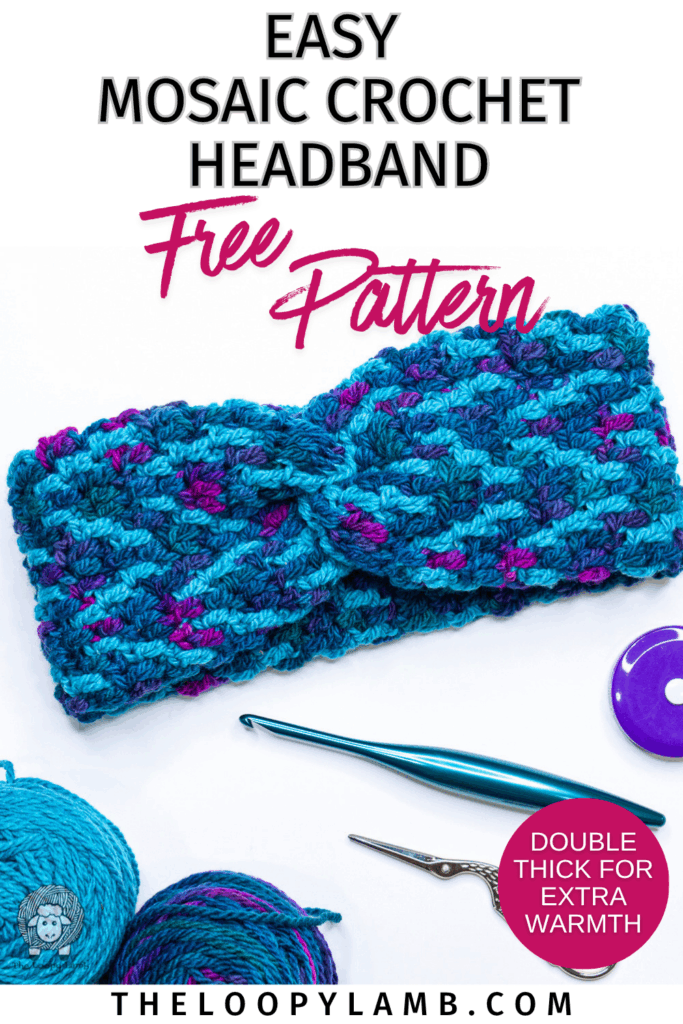
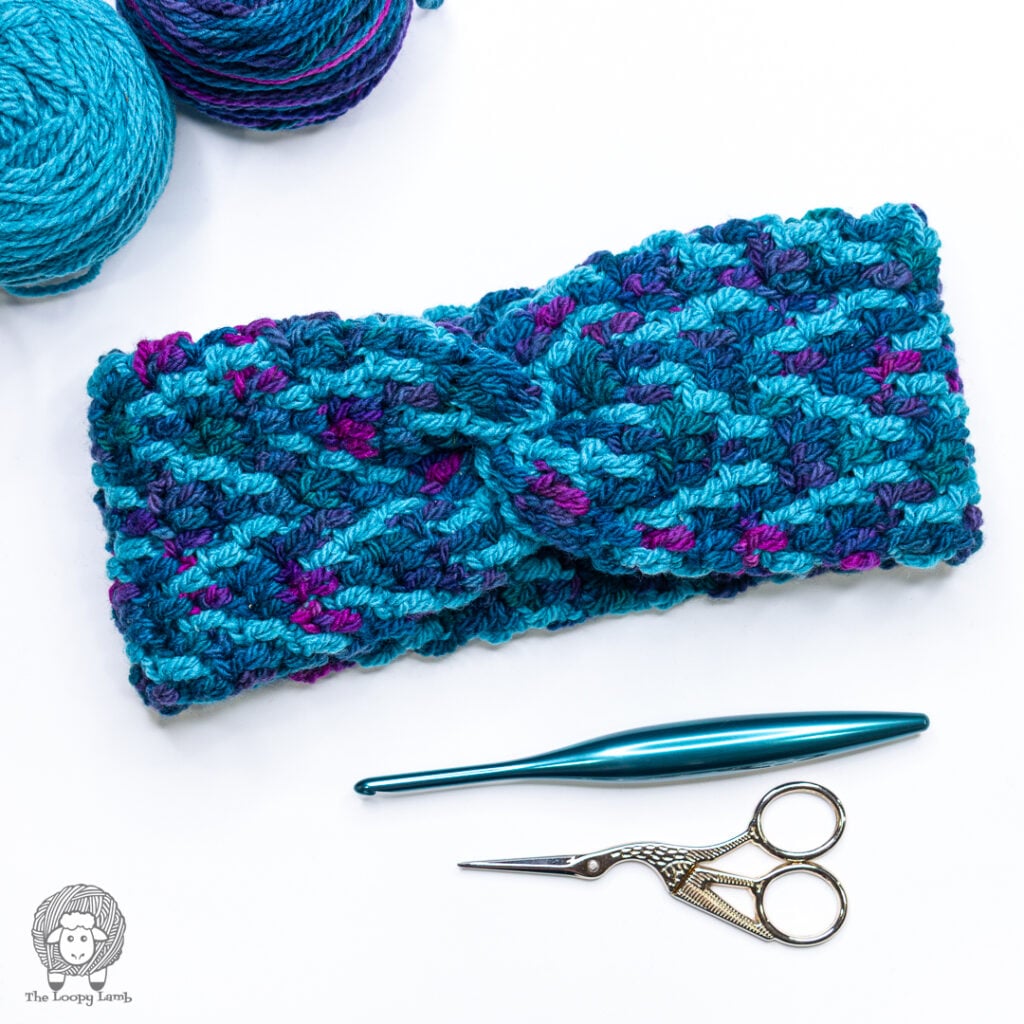
This mosaic crochet headband pattern is a fun and easy way to try overlay mosaic crochet techniques while making a stylish accessory you’ll actually wear. The geometric design looks intricate, but it’s created using simple stitches like single crochet and double crochet and looks beautiful in both bold and neutral color combinations.
In the In the Current Mosaic Crochet Headband pattern, you’ll work one color at a time and use drop down stitches to build the mosaic design. The pattern is worked in joined rounds and carries the yarn up the inside seam so you don’t have to cut your yarn at the end of every round. This also makes this cozy headband warmer because the fabric is double-thick.
If you’ve been wanting to try mosaic crochet or you’re looking for a quick project to practice the technique, this headband is a great place to start.
Keep scrolling for the free mosaic crochet headband pattern, including helpful tips, and the full written instructions and colorwork chart.
Pin This Free Pattern to Save It For Later Save It
*This post may contain affiliate links, which means that I may earn a small commission from qualifying purchases made through these links at no additional cost to you. All opinions are my own.*
Prefer a Printable Version?

This mosaic crochet headband pattern is available as a printable, ad-free PDF, perfect for printing or saving to your device.
The PDF version also includes:
- A seaming instruction photo tutorial
- A tutorial on how to read the colorwork chart
- A large printable colorwork chart that’s easy to follow while you crochet
Table of contents
See This Mosaic Crochet Headband Worn
Disclaimer
This free pattern is © Ashley Parker of The Loopy Lamb. You’re welcome to sell finished product made using it, I kindly request that you credit The Loopy Lamb as the pattern designer and link to https://theloopylamb.com. This pattern is for personal use only. Please don’t copy, share, or repost the pattern itself, translate or alter it, or use my photos. Video tutorial creation using this pattern is strictly prohibited.
Thank you for supporting independent designers by viewing this pattern right here on my blog. It helps me keep sharing free patterns with you.
Skill Level:
- Easy
Terminology:
- US terms
Supplies:
- H / 5.0 mm Hook (or whatever crochet hook size needed to match gauge)
- Mountain Colors Yarn – Montana (100% Merino-Rambouillet, Worsted Weight Yarn (4), 200 yd/183m, 100 g/3.53oz), in the following colors and amounts:
- Color A: Aquamarine – 1 hank (approx. 136 yd/68 g)
- Color B: Swiftcurrent – 1 hank (approx. 142 yd/71 g)
- Tapestry Needle
- Scissors
- Stitch Marker (optional)
Abbreviations:
- BLO = Back Loop Only
- CH(s) = Chain(s)
- DDC = Drop Down Double Crochet
- FLO = Front Loop Only
- FO = Finish Off
- Rep = Repeat
- RSSCC = Reverse Slip Stitch Color Change
- SC = Single Crochet
- SL ST = Slip Stitch
- ST(s) = Stitch(es)
- YO = Yarn Over
Special Stitches & Techniques:
- Drop Down Double Crochet (DDC): Work a double crochet into the front loop of the stitch two rows below in the same color, skipping the stitch directly behind on the current row.
- Reverse Slip Stitch Color Change: Remove loop in current color from your hook and insert hook from the back of the fabric through to the front of the fabric through the first stitch of the Round. Place the loop of the current color back on the hook and pull it through the stitch to the back of the fabric. Yarn over (YO) with the new color and pull through the loop on your hook. YO and chain 1 to secure.
Finished Size:
- Adult, One Size Fits Most
- Piece measures approx. 4” wide x 21” long before seaming
See Notes Section for guidance to adjust the size.
- Piece measures approx. 4” wide x 21” long before seaming

Gauge:
- 16 sts x 16 rows = 4”
Notes:
- Gauge is vital to the project to ensure it fits as expected. You can complete this project without matching gauge; however, this will affect the size of your finished project and the amount of yarn required.
- In Overlay Mosaic Crochet, you work one row/round of color at a time. This means that you will be changing colors at the end of every round. Color changes are made using the Reverse Slip Stitch Color Change (See Special Stitches & Techniques). To avoid weaving in ends, after completing the color change leave the old color attached (dropping it and leaving it out of work) and pick it back up when needed next, carrying the yarn up the inside seam of the headband. Alternatively, you can cut each color when finished with it and weave in the ends.
- How to Read the Written Pattern Instructions: The number indicated next to the instructions (i.e., DDC 7) means you’ll work a Drop Down Double Crochet stitch in the next 7 stitches. Where no number is indicated (i.e., DDC) you will do that stitch only once.
- Instructions in Brackets: i.e. [DDC, BLO SC 2] x 4 means that you’ll work a Drop Down Double Crochet in the first stitch, then Back Loop Only Single Crochet in each of the next two stitches. You’ll then repeat those instructions a total of 4 times.
- Numbers contained in the parentheses () at the end of each Round indicate the stitch count you should have after successfully completing each Round. Rounds without a number indicated in parentheses indicate that the stitch count continues unchanged from the previous row.
- This pattern is worked in joined rounds (unless stated otherwise). Do not turn at the end of the round unless indicated. Placing a stitch marker in the first and/or last stitch of the round can help prevent losing stitches or picking up extra stitches.
- This pattern is worked lengthwise. You can adjust the size of this project by adding or omitting rounds (ensuring you end on a Color A round).
In the Current Free Mosaic Crochet Headband Pattern
Using Color A, CH 32. Taking care not to twist the chain, SL ST into the first CH to join and form a ring.
Foundation Rows:
Round 1: CH 1. SC in the first CH and each CH around. RSSCC to Color B (see Special Stitches and Techniques). (32)
Round 2: BLO SC in the first ST and each remaining ST around. RSSCC to Color A.
Pattern:
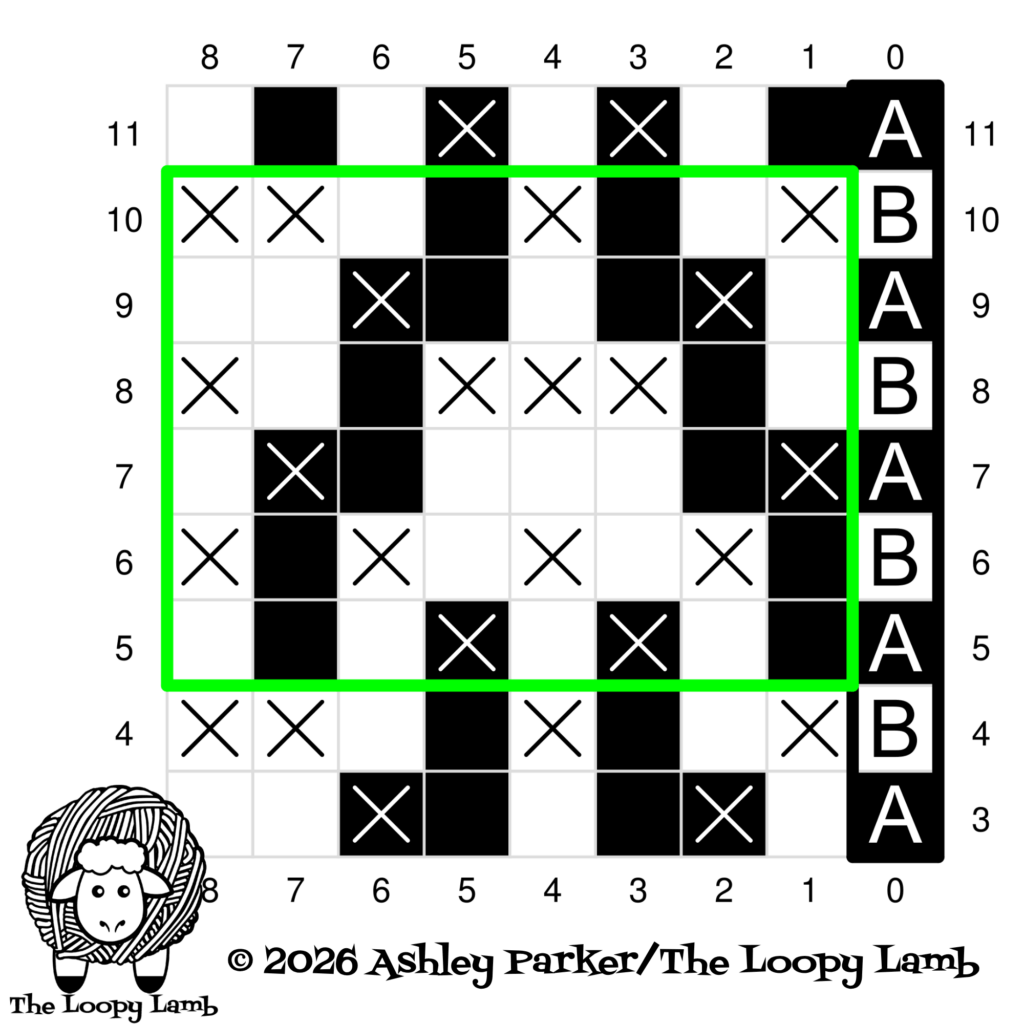
From Round 3, you can choose to use the written instructions below or follow the chart below as shown for Rounds 3 – 10, then repeating Rounds 5 – 10, twelve more times. End by working Round 11 on the chart (or Round 5 written instructions) before proceeding to the Seaming the Headband Closed instructions.
Round 3: *BLO SC, DDC, BLO SC 3, DDC, BLO SC 2, rep from * 3 more times. RSSCC to Color B.
Round 4: *[DDC, BLO SC 2] x 2, DDC 2, rep from * 3 more times. RSSCC to Color A.
Round 5: *BLO SC 2, DDC, BLO SC, DDC, BLO SC 3, rep from * 3 more times. RSSCC to Color B.
Round 6: *BLO SC, DDC, rep from * across. RSSCC to Color A.
Round 7: *DDC, BLO SC 5, DDC, BLO SC, rep from * 3 more times. RSSCC to Color B.
Round 8: *BLO SC 2, DDC 3, BLO SC 2, DDC, rep from * 3 more times. RSSCC to Color A.
Round 9: *BLO SC, DDC, BLO SC 3, DDC, BLO SC 2, rep from * 3 more times. RSSCC to Color B.
Round 10: *[DDC, BLO SC 2] x 2, DDC 2, rep from * 3 more times. RSSCC to Color A.
Rounds 11 – 82: Rep Rounds 5 – 10, 12 more times.
Round 83: Repeat Round 5.
FO leaving a long yarn tail at least 20 inches long to seam the piece closed. Proceed to Seaming the Headband Closed instructions.
Mosaic Headband Colorwork Chart
Seaming the Headband Closed
Fold the short ends of the ear warmer in half, facing each other (as shown in the image).

Bring the two short sides together and interlock them.

Thread your yarn tail onto a tapestry needle, and whip stitch the ends together, ensuring you work through all the layers with each stitch.

Once you reach the end, secure the yarn with a small knot and weave in the ends. Flip the ear warmer around out to reveal the finished twist.

That’s it! I hope you enjoyed making your In the Current Overlay Mosaic Crochet Headband! Let me know in the comments what colors you used. I love to hear what you are making.
Looking for more free crochet headband patterns or mosaic crochet patterns to try? Checking my Pink Lemonade Mosaic Granny Square, Easy Faux Knit Twist Crochet Headband, Textured Twist Headband.
Mosaic Crochet Headband Frequently Asked Questions
The best yarn for mosaic crochet is one that does not have much or any halo (fuzziness around the main strand of yarn). The halo can obstruct or minimize the appearance of the colorwork design created with mosaic crochet techniques so a yarn with little to no halo and strong stitch definition will give you the best outcome.
Overlay mosaic crochet, which is the technique used in this pattern, can be very easy. It uses only basic stitches like double crochet stitches and single crochet stitches to create its design so beginners can learn the technique easily.
Some of the most common mistakes in mosaic crochet are: joining your yarn to the wrong color and not checking your chart and work occasionally. . In mosaic crochet, you should only be joining your drop down stitches to rows worked in the same color. If you are joining color a to color b, for example, you’re joining your drop down stitches in the wrong place. Often, once you get into the rhythm of a pretty geometric design like this one, you tend to crochet on autopilot. Check your work at the end of every round and make sure to periodically check it against your work to ensure that you haven’t crocheted something incorrectly by mistake. Catching mistakes early can save you time later.
Absolutely you can! This project is a fantastic example of a mosaic crochet project that is done without cutting your yarn. To do this, we carry our yarn up the inside of the project rather than cutting our yarn at the end of each round as in other mosaic patterns. This is the perfect crochet pattern to practice carrying your yarn and since we are using a reverse slip stitch join, there are no unsightly seams either.
Absolutely! You can use any worsted weight yarn (4) you have or want to use that you can match the pattern gauge with. This yarn has a unique twist to it which adds some additional texture so your project may look slightly different when using a different yarn, but it will still be beautiful.
Want other free mosaic crochet patterns? You’ll love these!
If you post pictures of your finished mosaic headband on social media, I’d love to cheer you on and share your post with our community! Tag me @theloopylamb or use #theloopylamb so I can see your beautiful creations and maybe even feature you in my stories.
Join The Loopy Lamb Crochet Community Facebook Group to connect with other crafty friends and share your fabulous projects made with this free mosaic crochet headband pattern! Don’t forget to follow me on social media so you always know when new youtube tutorials and other new free crochet patterns are released. Happy Crocheting!
Facebook Page: www.facebook.com/TheLoopyLamb
Instagram:www.instagram.com/TheLoopyLamb
YouTube: The Loopy Lamb YouTube Channel
TikTok: www.tiktok.com/@theloopylamb
Pinterest:www.pinterest.com/theloopylamb
Newsletter: Sign up for my newsletter!